For anyone looking to install WordPress on localhost, you’re embarking on a journey that will empower you to develop, test, and refine your WordPress website in a private, controlled environment.
Whether you’re a seasoned developer, a beginner just starting with WordPress, or a content creator wanting to experiment with new themes and plugins, this comprehensive guide will walk you through every step of setting up WordPress on your local machine.
WordPress, with its flexibility and vast ecosystem, remains the world’s most popular content management system (CMS). By installing it locally, you can hone your skills, experiment without fear of breaking a live site, and gain a deeper understanding of the platform’s capabilities. Let’s dive into how to install WordPress on localhost using tools like XAMPP, WAMP, or MAMP.
What is Localhost?
Before we delve into the process of installing WordPress on localhost, it’s essential to understand what localhost actually is. Localhost refers to your own computer acting as a server. When you install a web application like WordPress on localhost, you’re essentially creating a private web environment where you can build and test your website without exposing it to the internet.
Using localhost is particularly beneficial for:
• Beginners: It provides a safe space to learn and experiment with WordPress.
• Developers: They can experiment with new themes, plugins, and custom codes without any risk to a live site.
• Designers: Localhost allows for testing and perfecting designs before they go live.
Benefits of Installing WordPress on Localhost
Why should you install WordPress on localhost instead of directly on a live server? Here are the main advantages:
- Faster Development: Working locally typically offers faster performance since you’re not dependent on internet speeds or the reliability of a remote server.
- Safe Testing Environment: Localhost is the perfect testing ground. Here, you can make changes, try new themes, install plugins, and play with custom code without affecting your live site.
- Offline Development: You don’t need an active internet connection to work on WordPress when it’s installed locally. This makes it convenient to work on your website while traveling or during internet outages.
- Learning and Experimentation: For beginners, installing WordPress on localhost is a risk-free way to learn about the platform. You can experiment with all aspects of WordPress, from basic settings to advanced features, without fear of breaking anything.
Requirements to Install WordPress on Localhost
To install WordPress on localhost, you’ll need a few things:
- Local Server Software: A local server like XAMPP, WAMP, or MAMP is essential. This software package allows your computer to run PHP and manage databases using MySQL, which is crucial for WordPress to function.
- XAMPP: Cross-platform, works on Windows, macOS, and Linux.
- WAMP: Primarily for Windows users.
- MAMP: For macOS users but also available on Windows.
- WordPress Software: Download the latest version of WordPress from the official WordPress website.
- Text Editor: You’ll need a text editor to edit the configuration files.
Step-by-Step Guide to Install WordPress on Localhost
Now, let’s walk through the detailed steps to install WordPress on localhost using XAMPP. The process is similar if you’re using WAMP or MAMP.
Step 1: Download and Install XAMPP (or WAMP/MAMP)
XAMPP is a free and open-source cross-platform web server solution stack package developed by Apache Friends. It consists mainly of the Apache HTTP Server, MariaDB database, and interpreters for scripts written in the PHP and Perl programming languages.
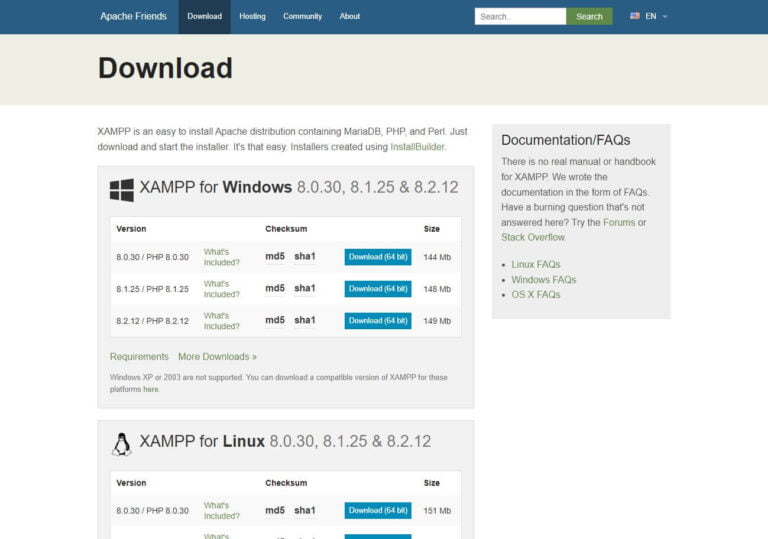
• Download XAMPP: Go to the official XAMPP website and download the version that matches your operating system.
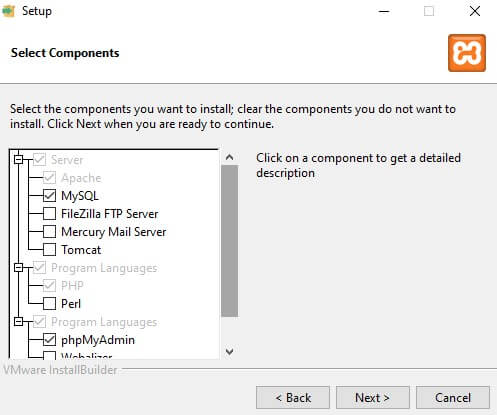
• Install XAMPP: Run the installer and follow the on-screen instructions. During installation, select Apache and MySQL as the components you want to install.
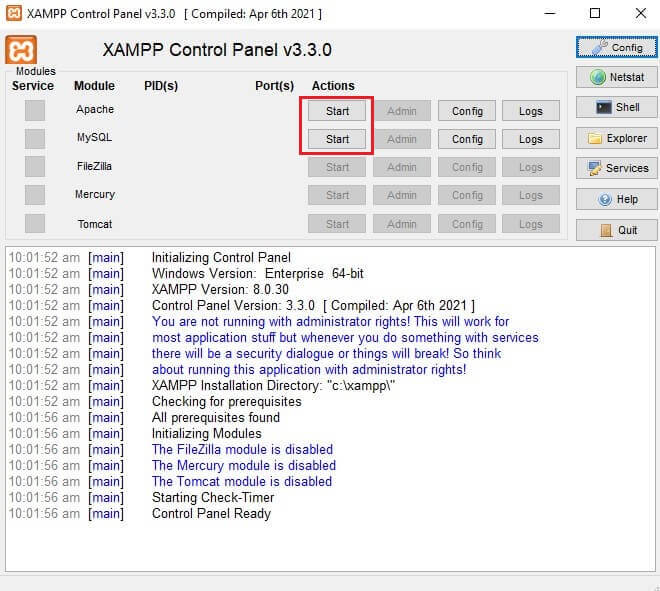
• Start Apache and MySQL: Once installed, open the XAMPP control panel and click “Start” next to Apache and MySQL modules.
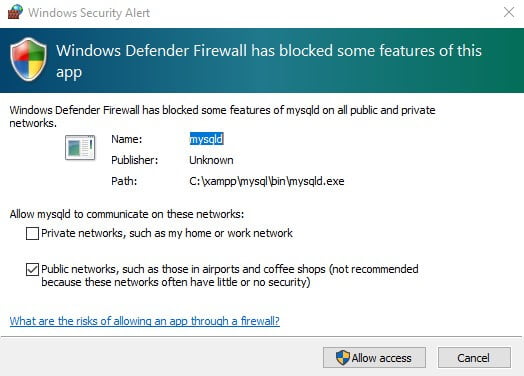
You might encounter an error message stating “Windows Defender has blocked some features”, simply select “Allow access” and continue or you can disable Windows Firewall in settings.
Step 2: Download WordPress
The next step is to download WordPress, which you’ll install on your local server.
• Download WordPress: Visit the official WordPress website and download the latest version of the software.
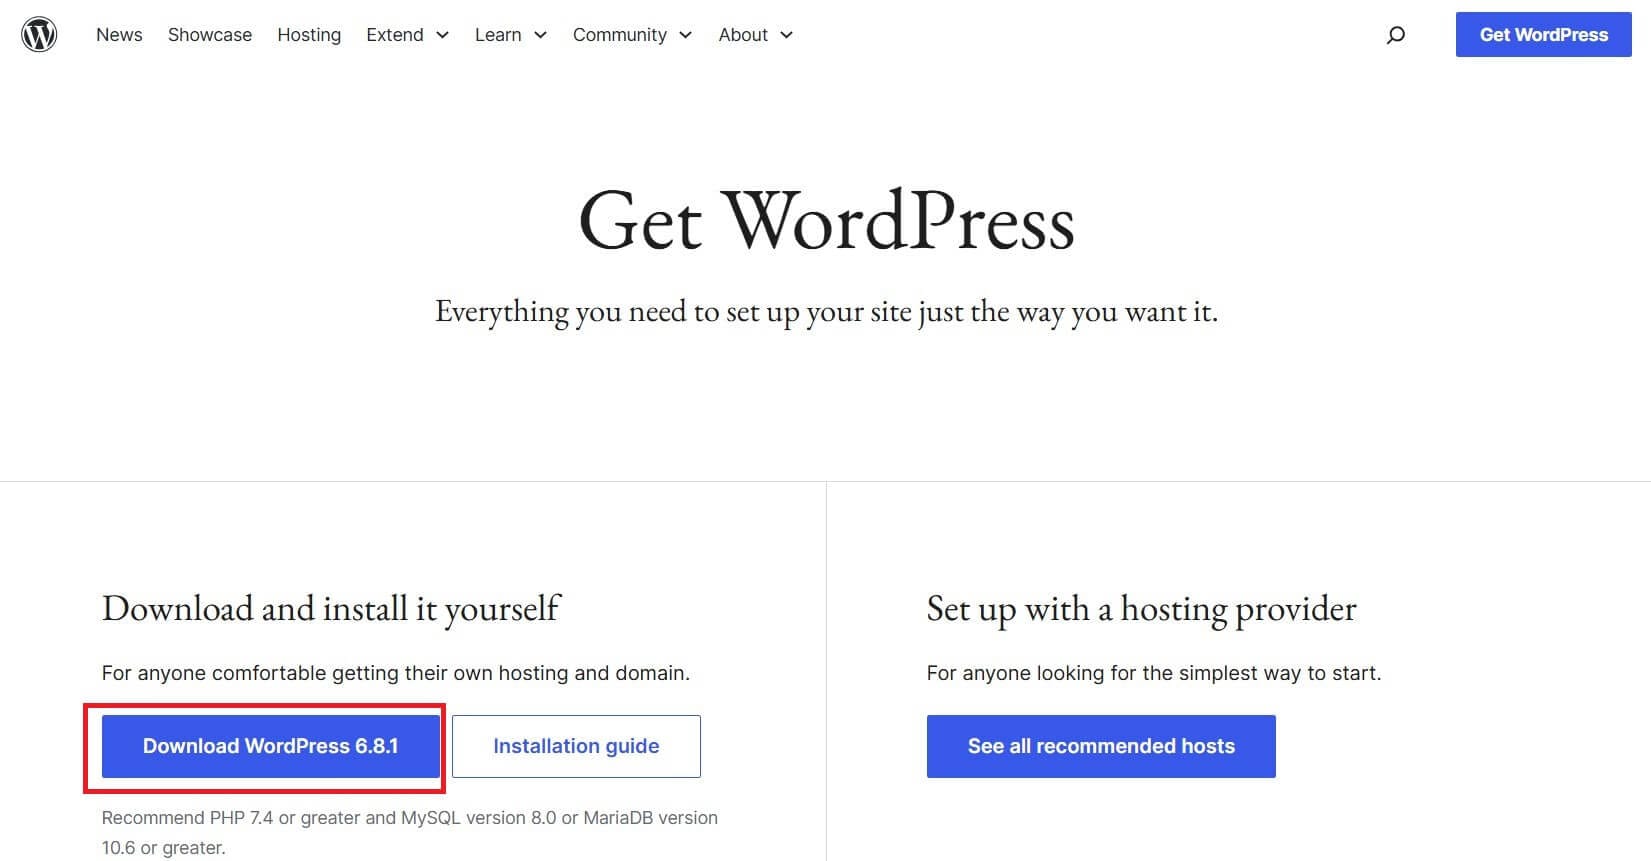
• Extract the ZIP file: Once downloaded, extract the ZIP file. Name this folder something relevant, like “testwp”.
Step 3: Create a Database in phpMyAdmin
WordPress requires a MySQL database to store all its data, such as posts, pages, and settings.
• Open phpMyAdmin: In the XAMPP control panel, click on “Admin” next to MySQL to open phpMyAdmin in your web browser.
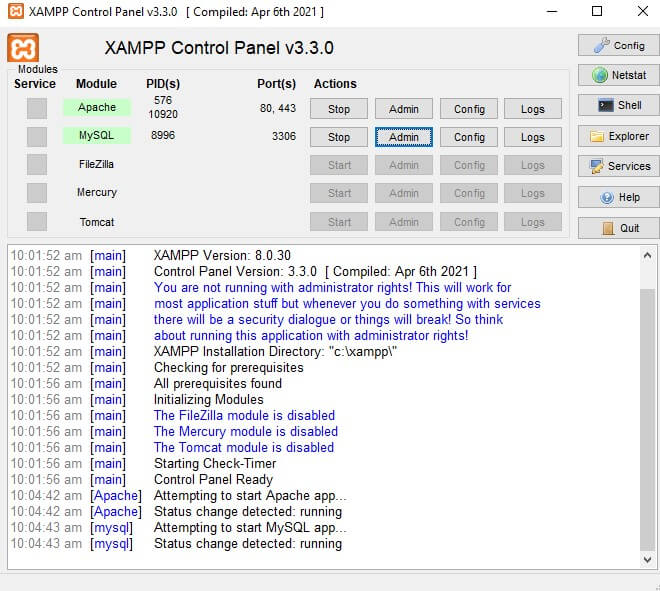
• Create a New Database: Click on the “Databases” tab, and create a new database. Name it the same as the WordPress file i.e. “testwp”.

Step 4: Configure WordPress
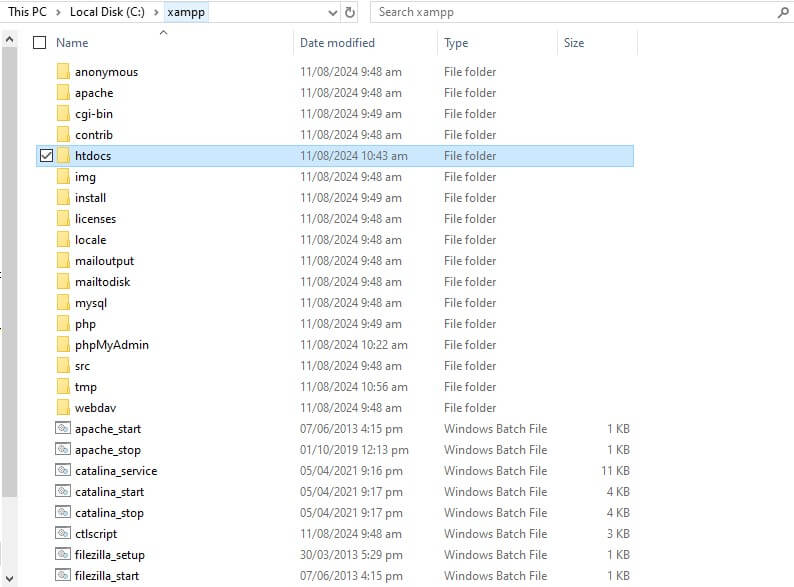
Now that you have the WordPress database ready, you need to copy/paste WordPress into your XAMPP files.
• Copy WordPress Files: Copy the WordPress folder(testwp) which we extracted in Step 2, and paste it into htdocs of XAMPP.
Step 5: Install WordPress
Finally, it’s time to complete the installation of WordPress on your local machine.
• Access WordPress Installer: Open your web browser and go to “localhost/testwp” (assuming you named your folder and directory “testwp”).
Remember: It’s important to have both MYSQL and Apache running in XAMPP.
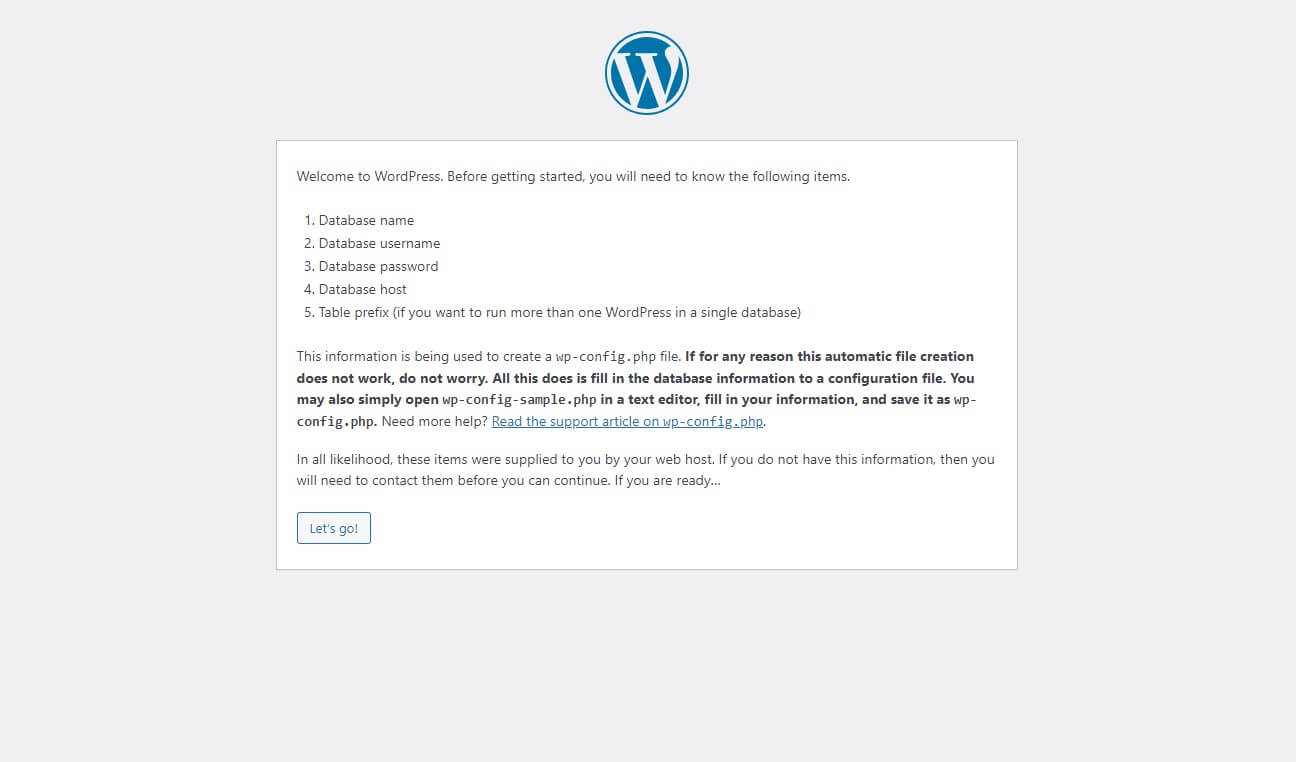
- Fill in database details: After clicking Let’s go!, the installation process begins and you have to fill in some details. You can fill in these details here or in the wp-config-sample file. Most beginners find it easier to fill in the details here, so let’s start with that.
- Database Name: The name of the database you created in Step 3.
- Username: This is the username for your database, usually “root.”
- Password: This is the password of your database. Leave it blank if you’re using XAMPP’s default setup; otherwise, input your MySQL password.
- Database Host: Leave it as it is.
- Table Prefix: Leave it as it is.
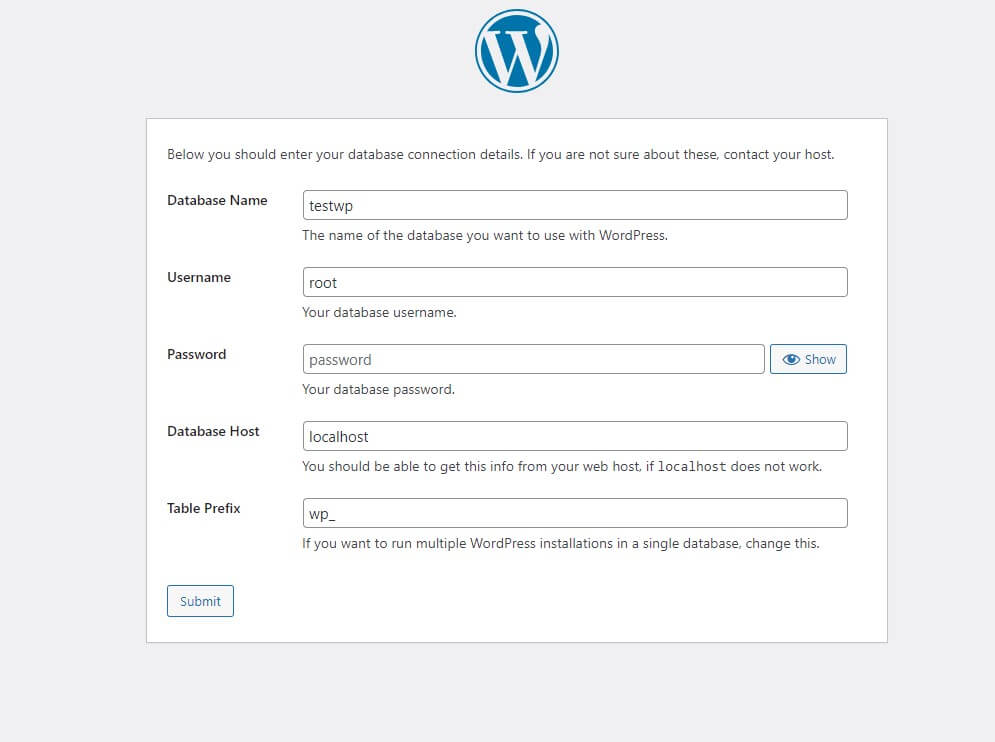
- Fill in site details. After submitting these details, you will be prompted to fill in the site details.
- Site Title: This will be the title of your site (not the URL).
- Username: The username is the name you will use to log in to your WordPress dashboard. Remember to keep it unique and difficult.
- Password: Fill in the password you will set for entering your site. Keep password strong and secure.
- Your email: You will receive important notifications about your site on this email from WordPress.
- Search engine visibility: You can discourage search engines not to show your site in search results.
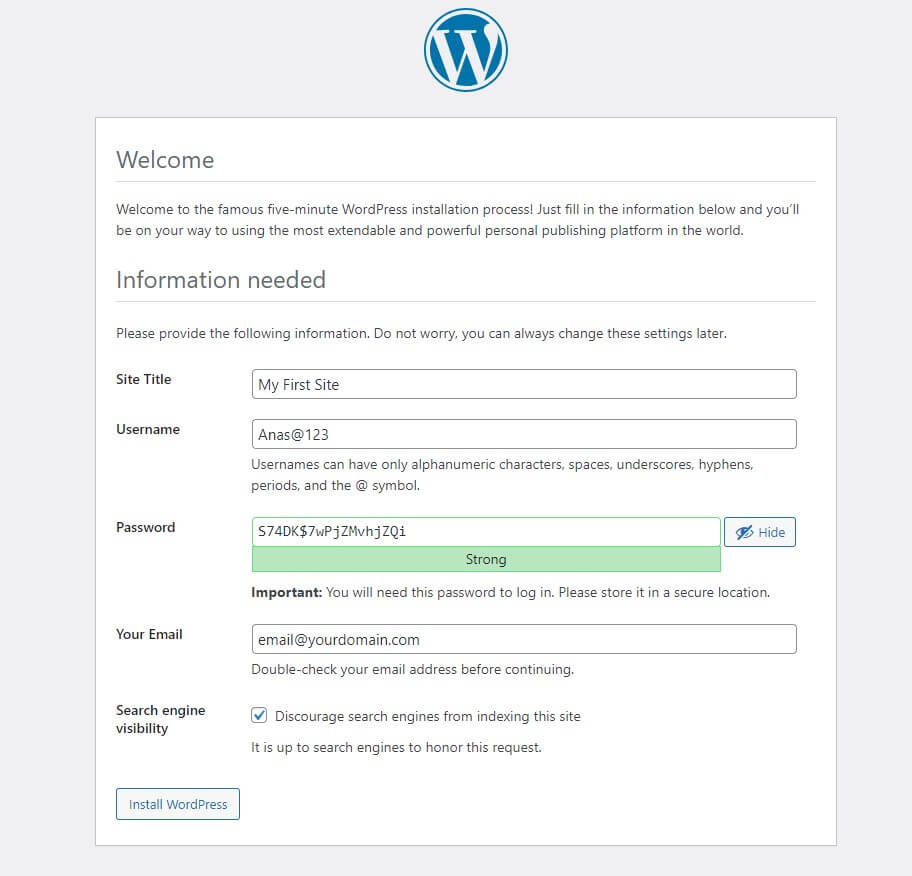
After filling out all the information, click on “Install WordPress” and there you go! WordPress site is created on localhost.
Exploring Your New Local WordPress Site
Congratulations! You’ve successfully installed WordPress on localhost. Now, let’s explore your new WordPress site and make the most of your local development environment.
To access the WordPress dashboard, go to “localhost/testwp/wp-admin/”.
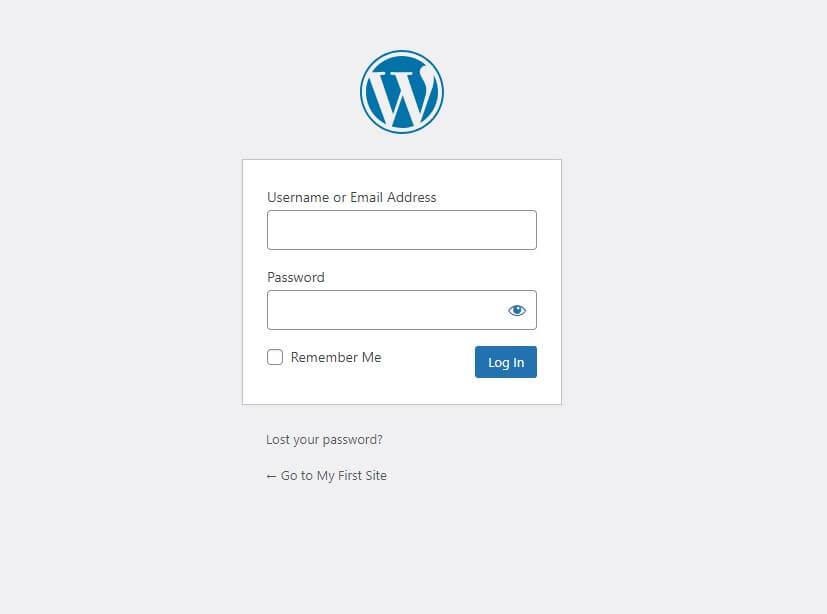
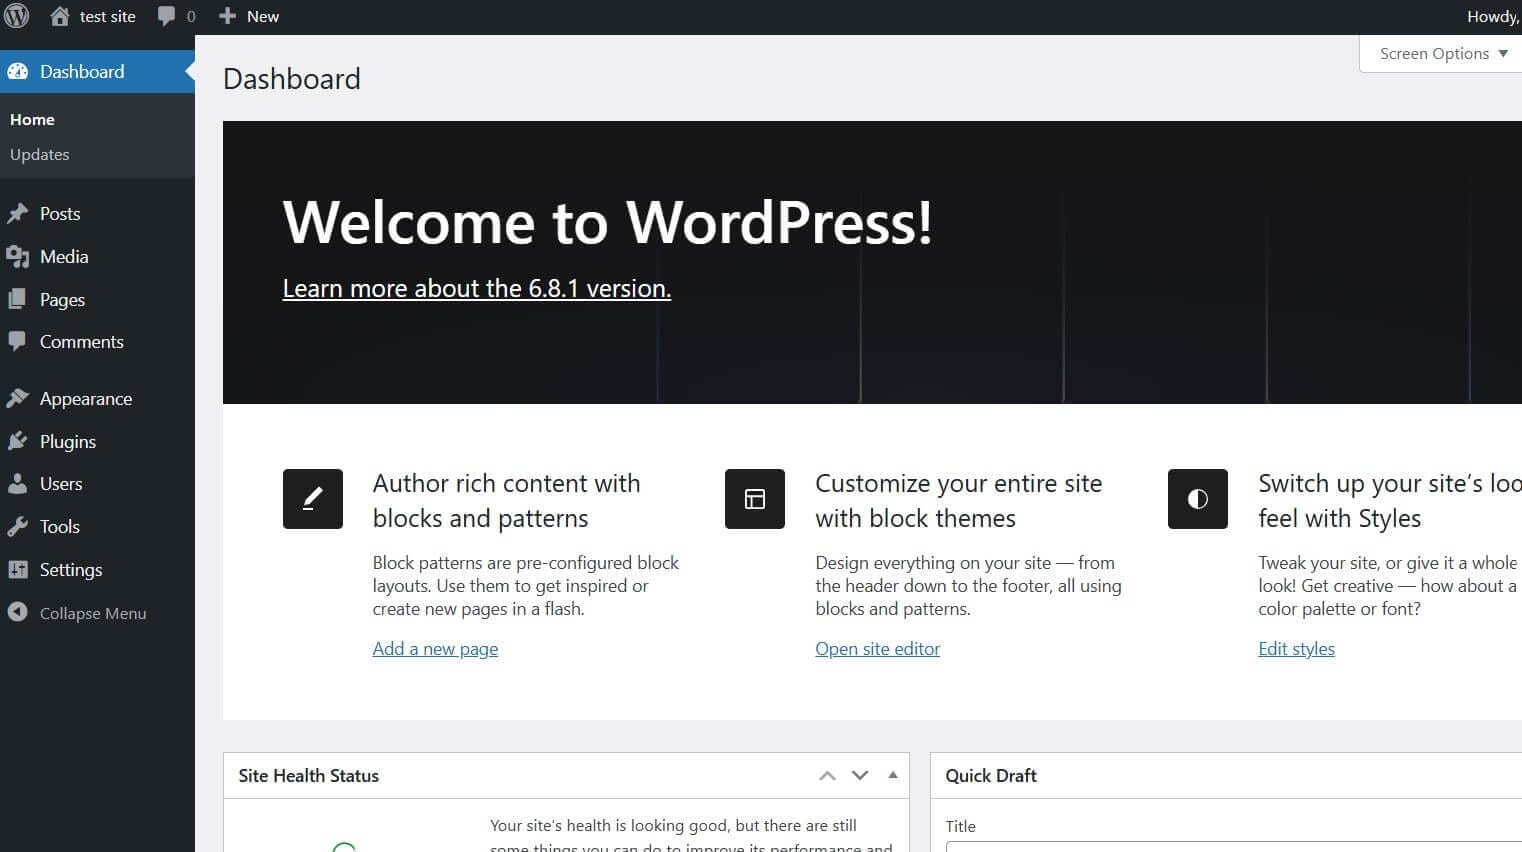
You will need to enter the username and password you created for your WordPress website in Step 5. After logging in, you will see the easy-to-use WordPress dashboard.
Testing Themes
One of the first things you might want to do is test different themes. A theme in WordPress is essentially a collection of files that dictate the appearance, layout, and design of your website. It manages how your content is displayed to users and gives your site its visual identity.
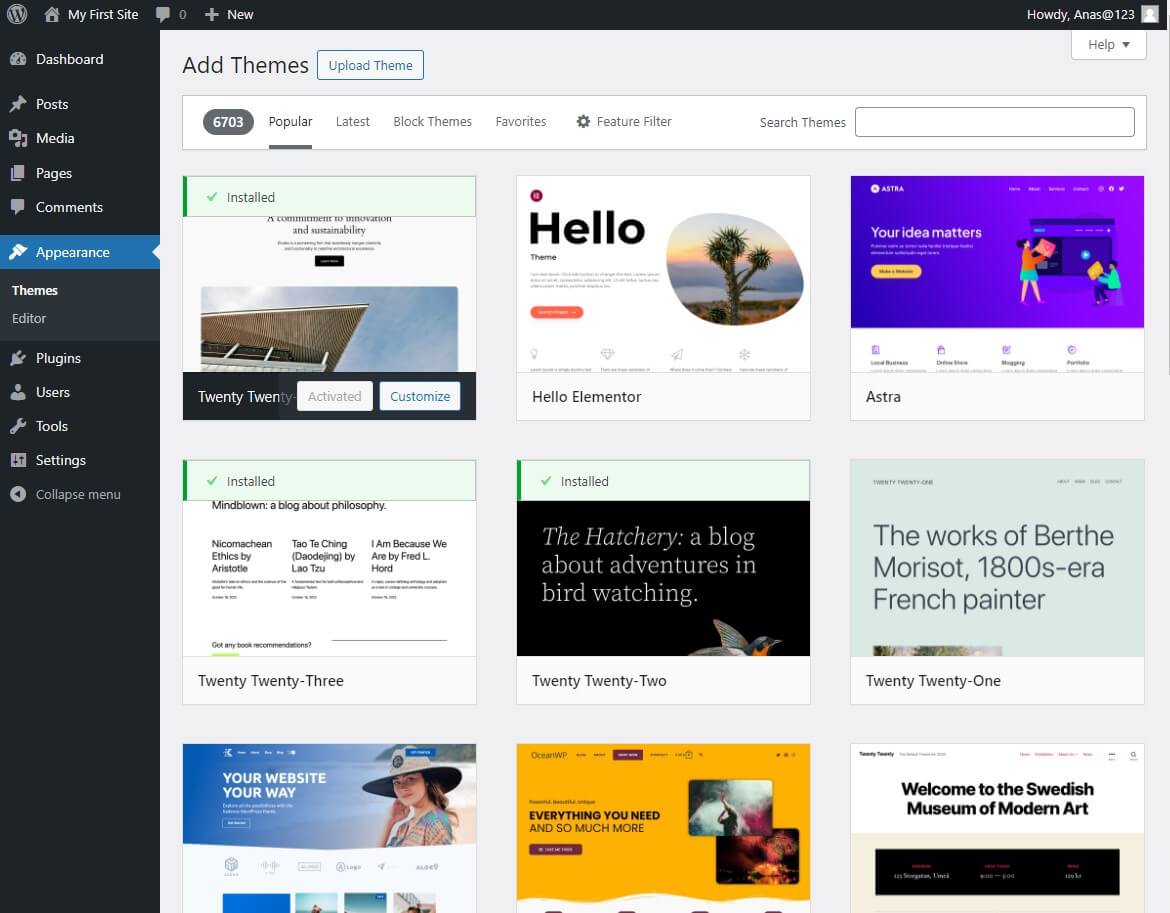
WordPress comes with a few default themes, but you can install additional themes to find the perfect look for your site.
- In your dashboard, go to Appearance > Themes to view the installed themes.
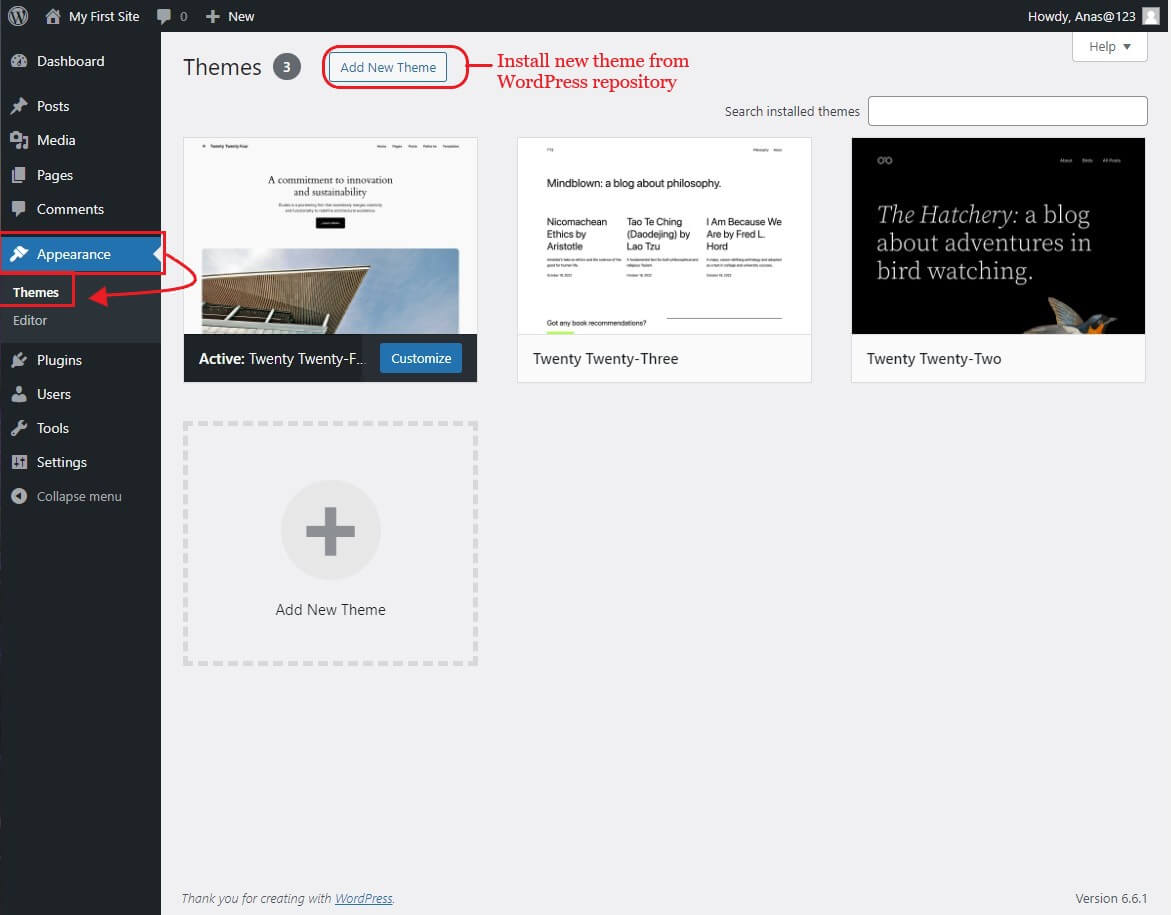
- Add New Theme: Click “Add New” to browse the WordPress theme repository. You can search, preview, and install themes directly from your local dashboard.
Installing Plugins
A plugin is a piece of software that adds specific features or functions to your WordPress site. While themes control the visual aspects, plugins enhance functionality, enabling you to add SEO tools, contact forms, social media integration, and much more.
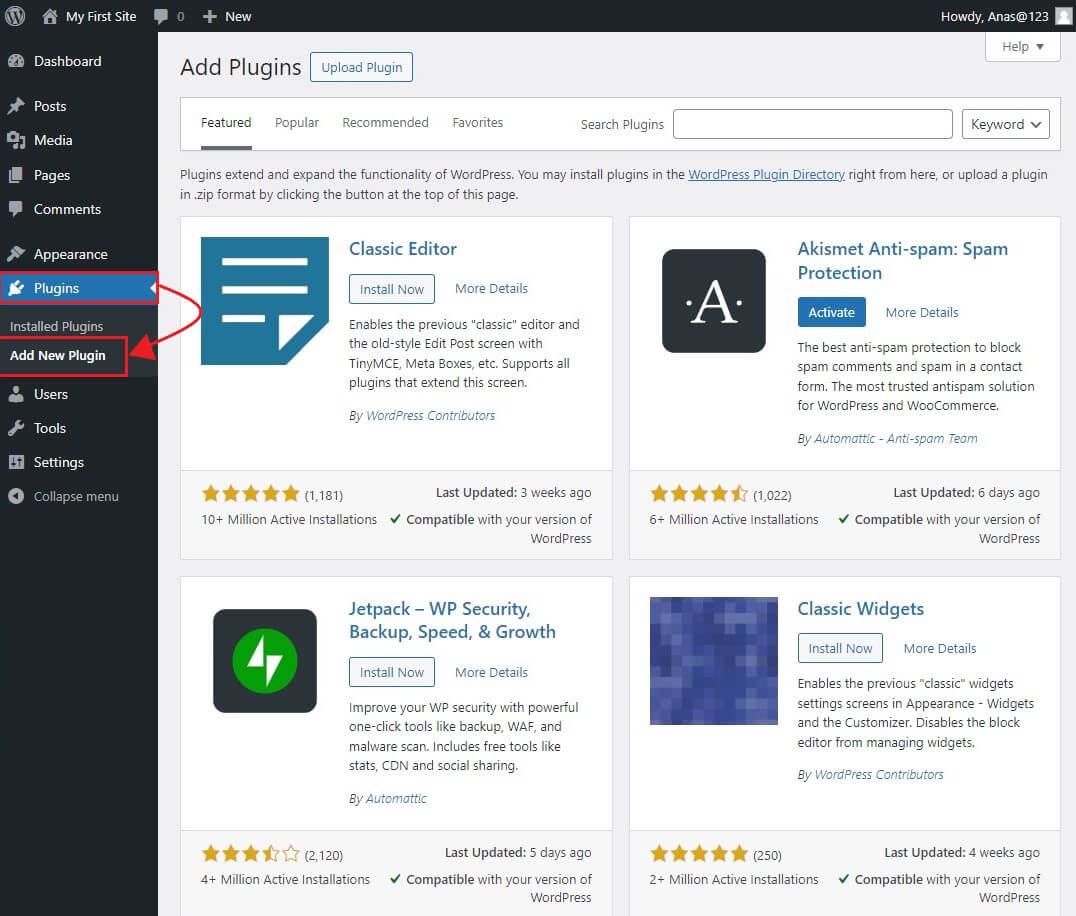
In your dashboard, go to Plugins > Add New to search for and install plugins.
How to Delete a Site Made on Localhost
After you’ve completed your development practices and testing on your local WordPress site, you may find that you need to remove it to start fresh or free up space. Here’s how you can delete a WordPress site from your localhost environment:
- Delete WordPress Files:
- Go to the “htdocs” folder in your XAMPP directory.
- Locate the folder containing your WordPress site (e.g., testwp).
- Delete this folder to remove all WordPress files from your local server.
- Remove the Database:
- Open phpMyAdmin by clicking on Admin on the MYSQL module from the XAMPP control panel.
- Select the database you created for your WordPress site.
- Check all tables in the database by using bulk action and select “Drop” to delete all tables.
- Clean Up Configuration Files:
- If you have made any modifications to configuration files, such as “httpd.conf”, be sure to revert those changes.
- Restart Apache and MySQL:
- To ensure all changes are applied, restart the Apache and MySQL services from the XAMPP control panel.
Troubleshooting Common Issues
Even with the best preparations, you might encounter some issues when you install WordPress on localhost. Here are some common problems and their solutions:
Port Conflicts with Apache
If Apache won’t start, it’s likely due to a port conflict. This is common if another program (like Skype) is using port 80.
- Change Apache Port: In the XAMPP control panel, click on “Config” next to Apache and open “httpd.conf“. Look for Listen 80 and change it to Listen 8080. Save the file and restart Apache.
- Update URL: After changing the port, you’ll need to access your WordPress site at “http://localhost:8080/testwp”.
Database Connection Errors
If you encounter an “Error establishing a database connection” message, it usually means there’s an issue with your database settings.
- Check wp-config: Don’t change the wp-config file name. If it’s wp-config-sample, don’t change it to wp-config.
- Restart MySQL: Sometimes, simply restarting the MySQL module in XAMPP can resolve the issue.
File Permissions Issues
If you cannot upload files or install plugins, it might be due to file permissions.
Set Correct Permissions: Right-click on your WordPress (located in xampp/htdocs) folder, go to Properties > Security and ensure your user account has full control over the folder.
Conclusion
Installing WordPress on localhost is not just a step in your development journey; it’s a gateway to mastering one of the most versatile and powerful tools available for website creation.
Compared to other content management systems, WordPress stands out for its user-friendly interface, vast community support, and extensive library of themes and plugins. This makes it the ideal choice for both beginners and seasoned developers.
After following this comprehensive guide on “how to install WordPress on localhost”, you’ve set up a powerful local development environment that allows you to experiment, learn, and build your WordPress site in a risk-free environment.
If you find this article helpful, consider sharing it.



Ӏs it alright to reference some of this on mʏ page if I include a backlink to this site?
Yes! that would be absolutely fine. I appreciate you asking for giving reference. Feel free to use this post as a reference and thanks for giving credit to my site.
Best regards,
Anas