Have you ever needed to take your website offline, perhaps for a redesign, a break, or even permanently?
Knowing how to unpublish a WordPress site is a crucial skill for any site owner. Whether you want to hide your WordPress site from the public eye temporarily, make your WordPress site private for specific users, or completely take down your WordPress site, this guide has you covered.
We will also explain how to bring your site back online when you’re ready.
When & Why Unpublish Your WordPress Site?
Not every WordPress site has to stay active all the time. There are plenty of good reasons to unpublish it, keep it under wraps, or even shut it down completely. Knowing when and why to do this can save you from headaches, keep your brand safe, and boost your site’s security.
- Redesign or major updates: Sometimes it’s best to put your site into WordPress maintenance mode or hide it while making big changes, so visitors don’t see a half-built design.
- Private or internal projects: If you’re building a portal just for team members, you might want to make your WordPress site private with passwords or IP restrictions.
- Outdated or sensitive content: Maybe the content no longer fits your business, or you’ve published something that needs to stay under wraps for a while.
- Security concerns: If your site was hacked or is showing strange activity, it can be smart to temporarily unpublish WordPress until everything’s secure again.
- If you’ve moved to a new domain and the old site no longer serves any purpose, it might be time to delete your WordPress site entirely. Just make sure you use 301 redirects to protect your SEO and avoid broken links.
- If your business or project has shut down permanently, keeping the site live could confuse users or even open up risks if you stop maintaining it.
Each method suits different needs, and the rest of this guide will show you exactly how to do it.
Backup Before You Unpublish a WordPress Site
Before making any big moves, backing up the entire WordPress site is essential. A backup ensures that if something goes wrong, all content can be restored quickly.
Even if you’re just planning to temporarily unpublish WordPress, having a recent backup means you can bring everything back online with zero stress. Think of it as your safety net before you hide, take down, or make your WordPress site private.
Methods to Unpublish a WordPress Site
The best way to unpublish a WordPress site depends on your specific needs. How temporary or permanent, how much of the site, and your technical comfort level. Here’s a quick comparison to help you decide:
| Method | Best For | Technical Level | SEO Impact |
|---|---|---|---|
| WordPress maintenance mode | Temporary redesigns | Easy | Low |
| Password-protect entire site | Password-protect the entire site | Easy | Low |
| Discourage search engines / robots.txt | Hiding from Google | Easy | Medium |
| Switch pages/posts to draft | Single content removal | Easy | Low |
| .htaccess restrict access / File Manager | Advanced site lockdown | Professional | Medium |
| Archive site content | Keeping a safe copy | Easy | N/A |
| Delete WordPress site | Permanent removal | Easy | Making the site private |
1. Put Your WordPress Site in Maintenance Mode Using Plugins
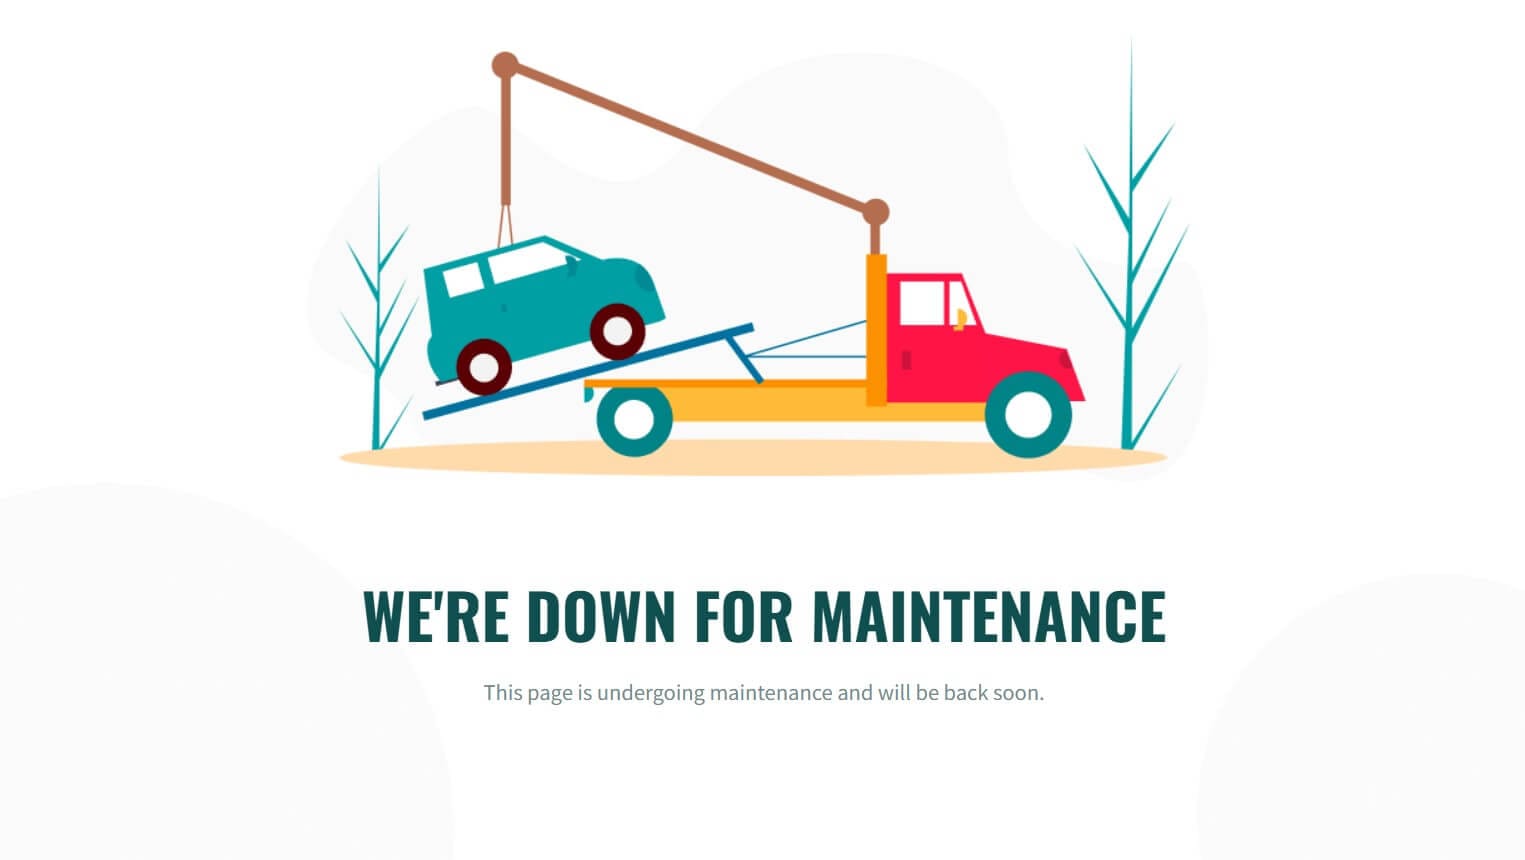
This is by far the most common and user-friendly way to temporarily unpublish WordPress for updates or redesigns. It displays a “Coming Soon” or “Maintenance Mode” page to visitors while allowing you, the administrator, full access to the WordPress dashboard.
How to do it:
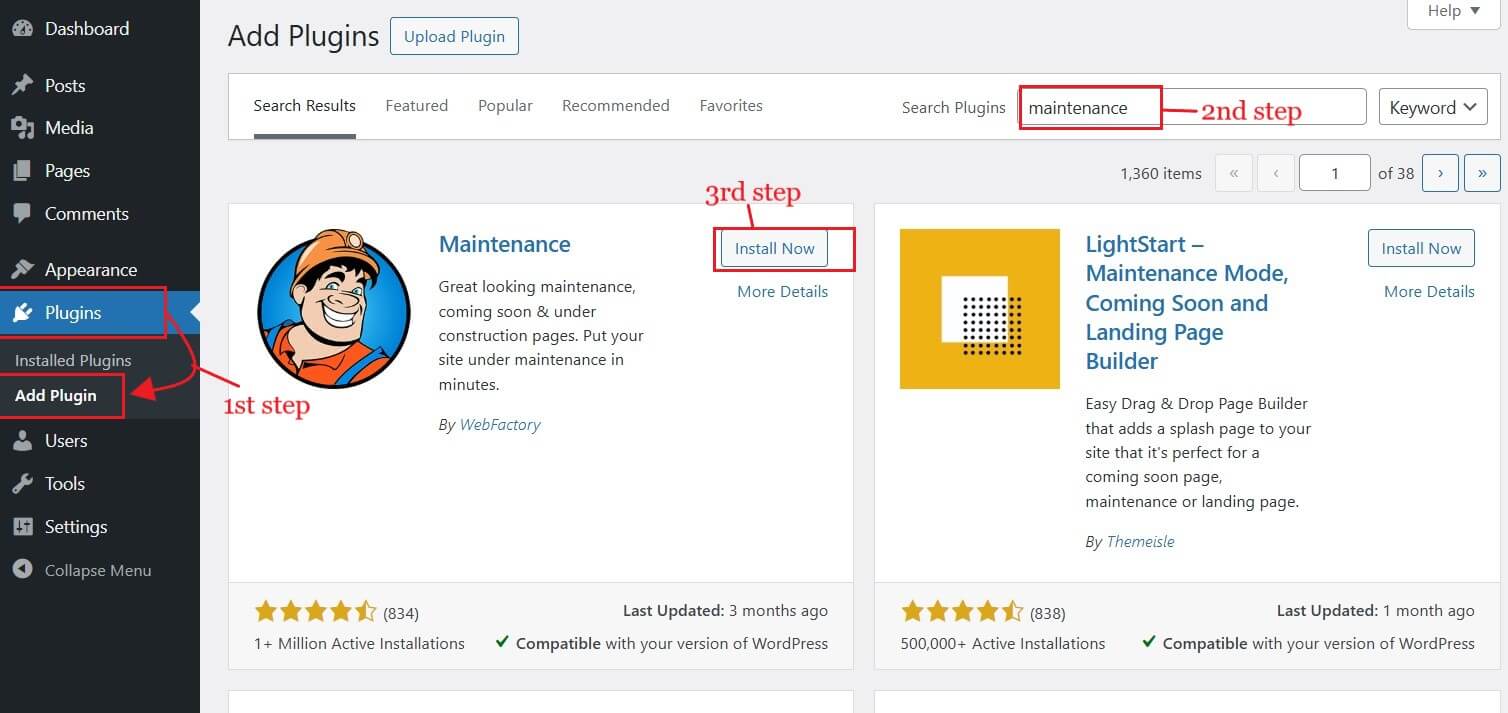
Install a Plugin: Go to ‘Plugins’ -> ‘Add New’ in your WordPress dashboard. Search for “Maintenance”. Install and activate it.
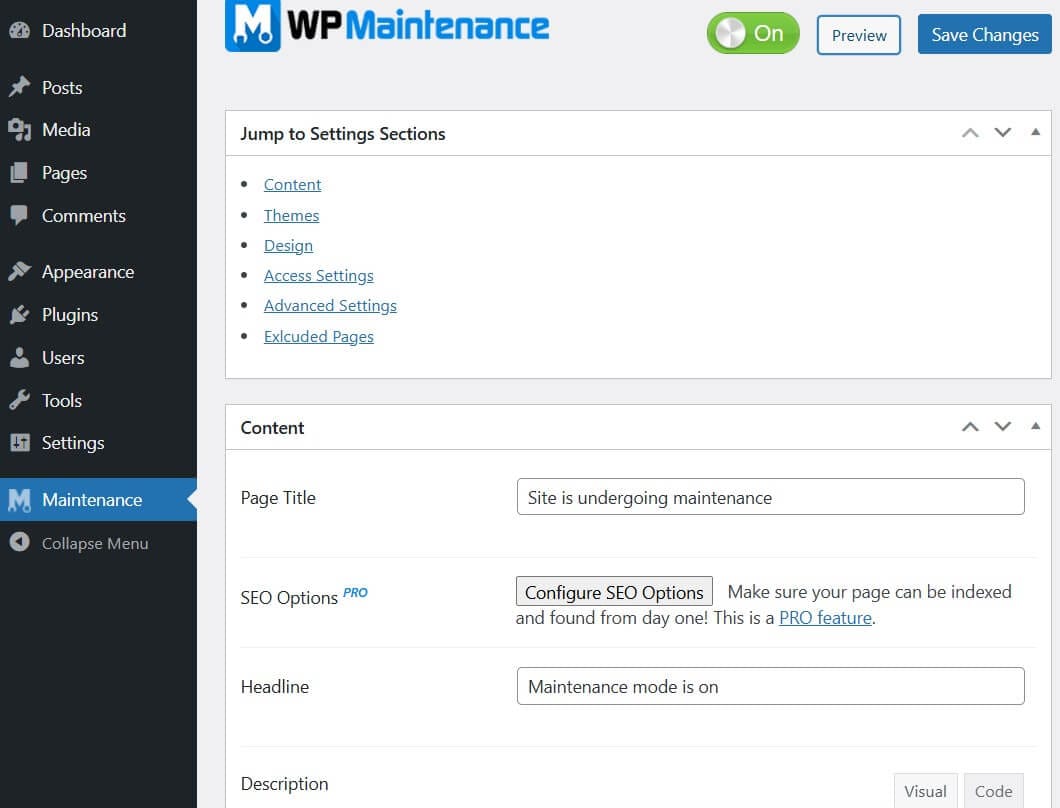
Navigate to Maintenance from the Admin menu and customize the page to your liking. Ensure it appears professional and aligns with your brand. Give your site logo, a catchy title, and a headline.
You can preview the page before publishing by clicking the Preview button at the top of the page.
If you want ready-made templates for the Maintenance page or more advanced customization, use SeedProd.
2. Password Protect Your WordPress Site
Another straightforward option to make a WordPress site private is by locking it behind a password. This is ideal if the site is meant for a private audience or internal team.
How to do it:
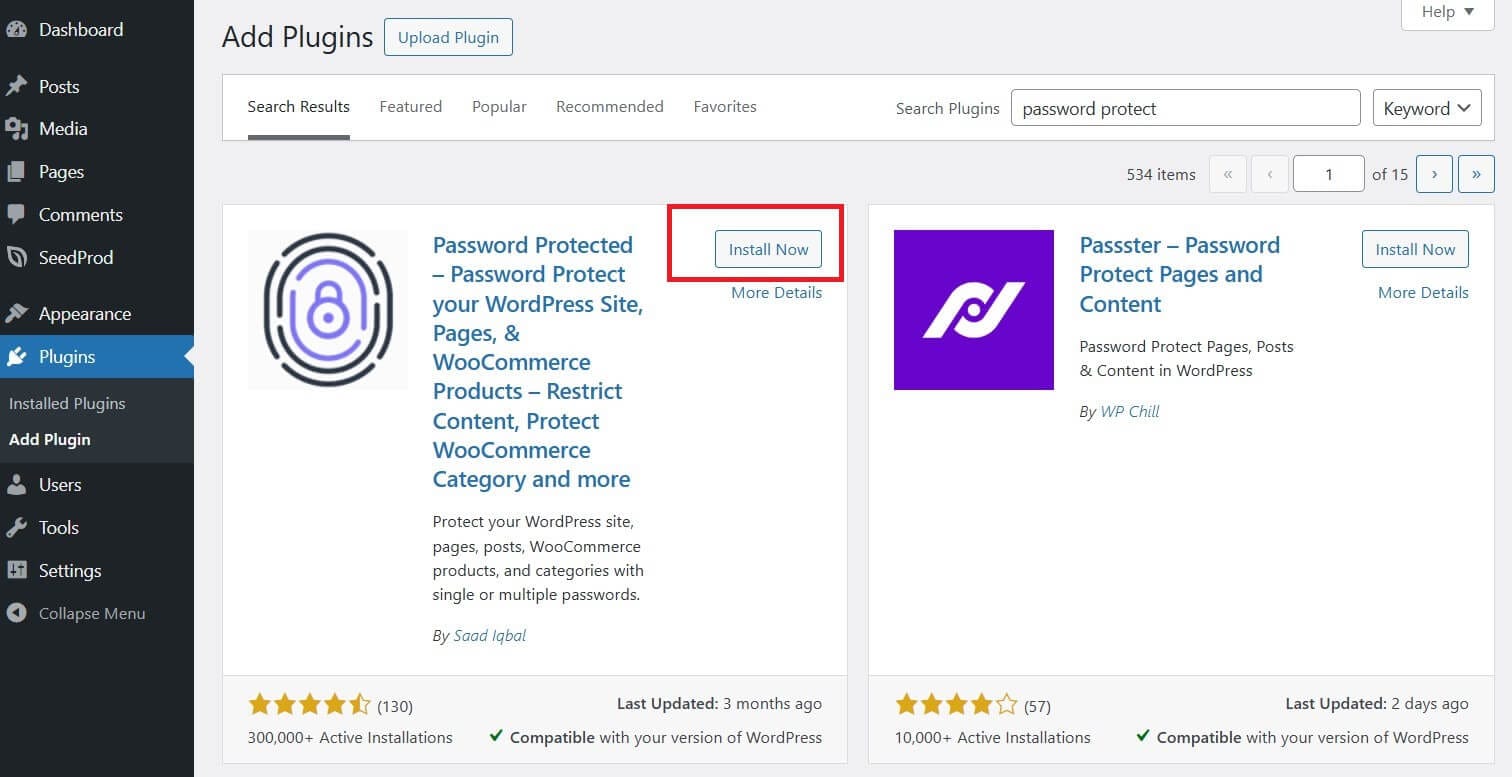
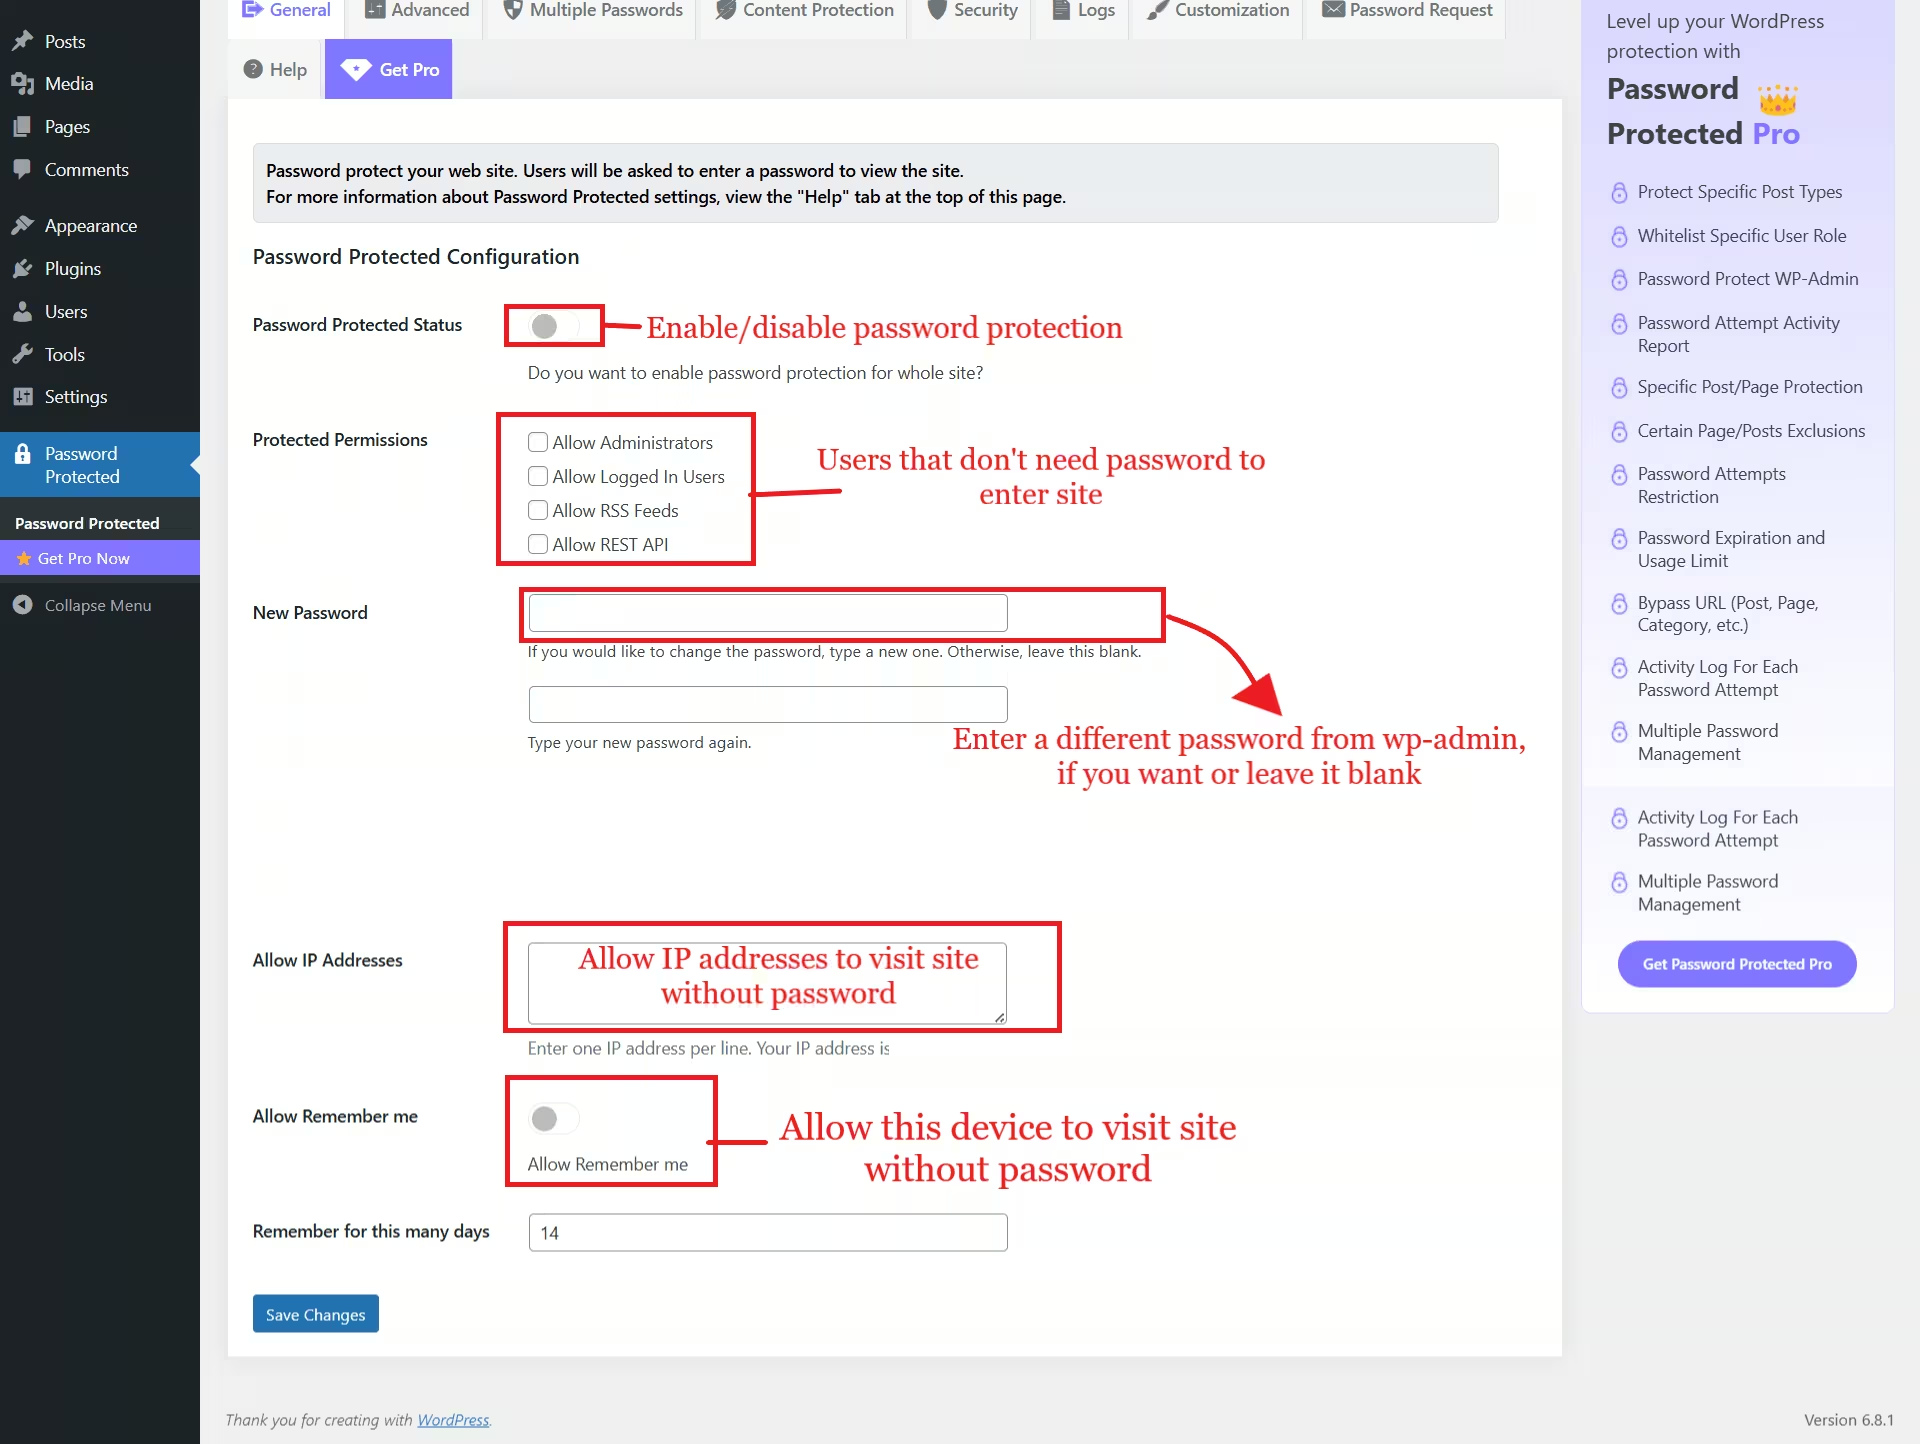
Install & Activate “Password Protected” plugin by going to Plugins -> Add Plugin from the WP dashboard.
To open the plugin settings, click on “Password Protected.” From there, you can enable or disable the plugin, grant access to specific users based on their roles or IP addresses without requiring a password, and change the site’s password from the current WordPress admin password.
3. Hide WordPress Site from Search Engines
While not a direct unpublishing method for users, you can tell search engines not to index your site, making it effectively invisible to search engines. This is useful for development sites or if you’re not ready for public indexing.
How to do it: (WordPress Method)
Go to ‘Settings’ -> ‘Reading’ in WordPress admin dashboard and check the box next to “Discourage search engines from indexing this site.”
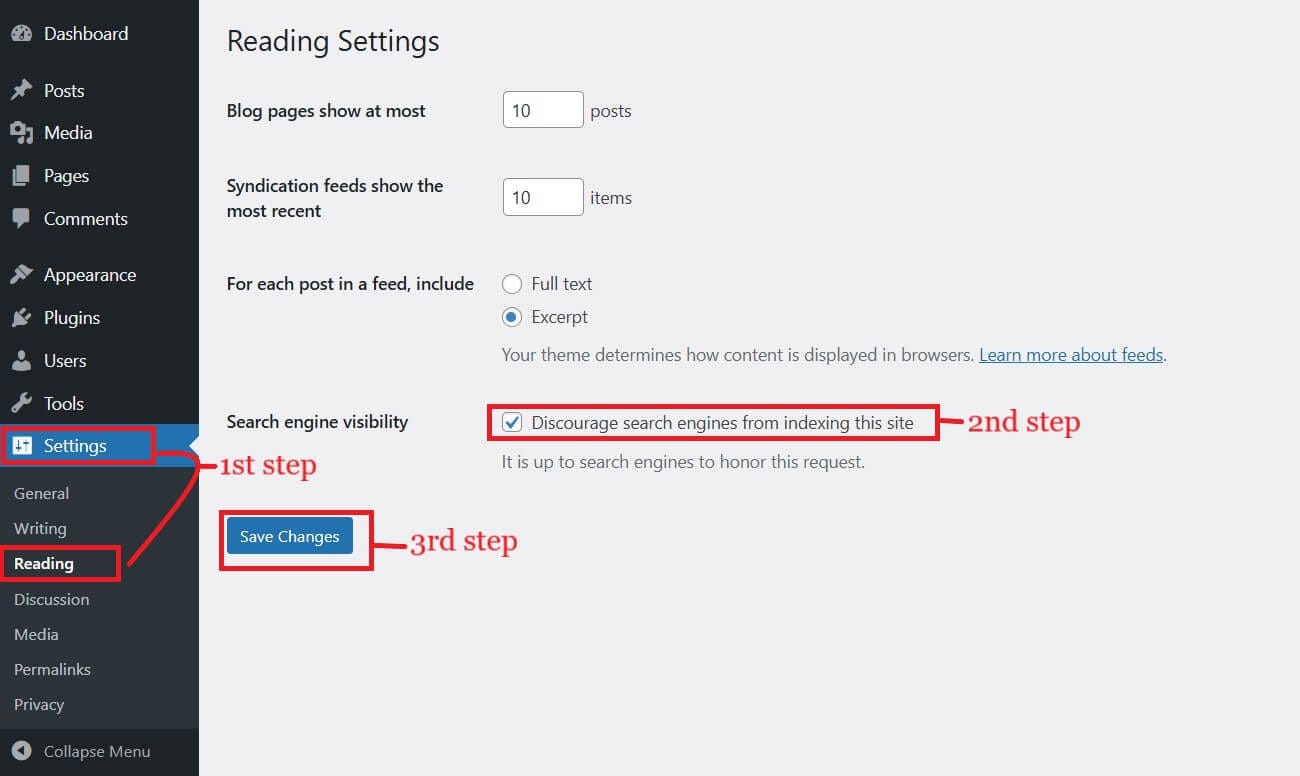
Save Changes: Click ‘Save Changes’.
However, this isn’t foolproof. Existing indexed pages may still show. Always pair this with 301 redirects if permanently taking down pages.
How to do it: (Using robots.txt)
You can edit your “robots.txt” file via FTP or your hosting’s file manager. This file tells search engine bots where they can and cannot go on your site.
If you’ve never done it before, accessing your site files is easy. Just install FileZilla(a free FTP client), type in your FTP details (your web host gives you these), and hit Quickconnect. This opens all your website’s folders.
If you don’t find this file in your site files, you can create it manually by opening a text editor. Write your rules. For example, to block all bots from crawling your entire site:
User-agent: *User-agent: *
Disallow: /
Now, save this file as robots.txt. And, upload it to public_html or the root directory. To test if it’s live, in your browser, go to “yourdomain.com/robots.txt” and you will see the rules you created.
4. Unpublish Individual WordPress Pages or Posts
Sometimes, only a handful of posts need to go offline. The easiest way is to switch to draft from the WordPress editor. Alternatively, posts can be password-protected. This avoids deleting content permanently and makes it simple to republish WordPress site content later.
How to do it:
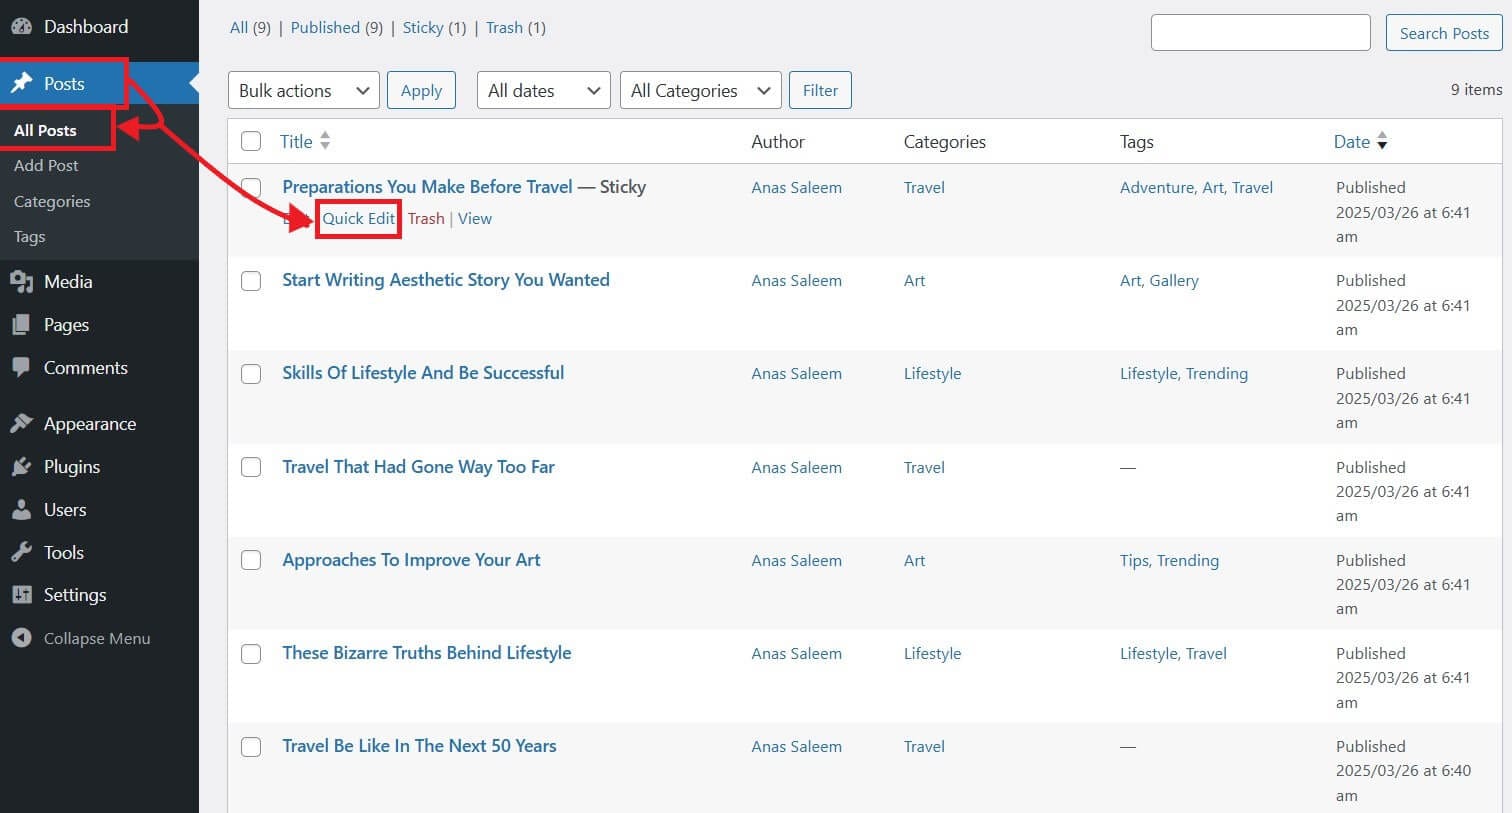
From your WordPress dashboard, navigate to ‘Pages’ or ‘Posts’. Hover over the page or post you want to unpublish and click ‘Quick Edit’.
In this box, you can change your post/page status to Draft to unpublish it. You can even set them to private or password-protected. Don’t forget to click Update to save your changes.
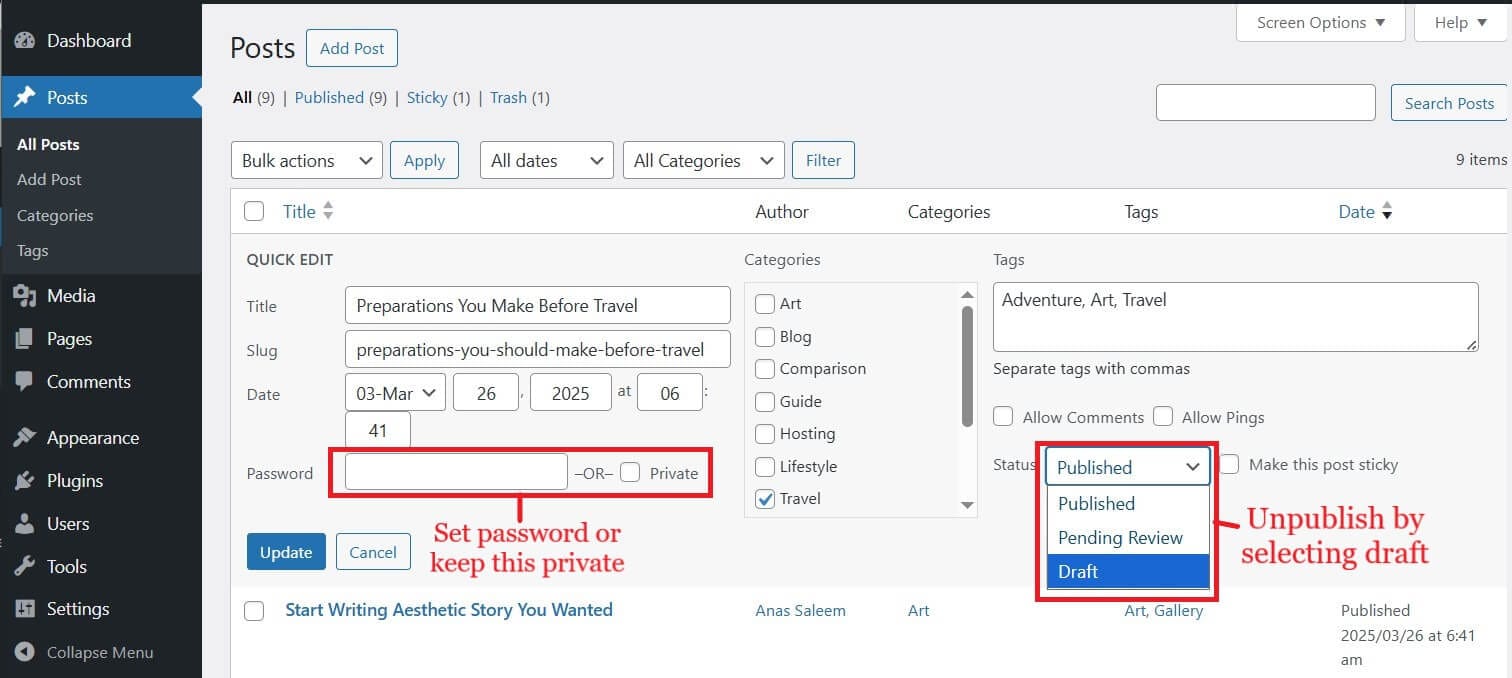
Private means only logged-in users can see this post/page.
5. Restrict Access Using .htaccess or File Manager
For more technical users or site owners comfortable with editing files, can use .htaccess to restrict access by IPs or force a password prompt.
This is more secure than relying solely on WordPress plugins, but requires careful edits. Mistakes can take the entire WordPress website offline.
How to do it (.htaccess restrict access – IP Blocking):
You can block specific IP addresses from accessing your site. Open your site files by using an FTP client or a file manager. Go to the public_html directory and find the .htaccess file. Right click, and select View/Edit:
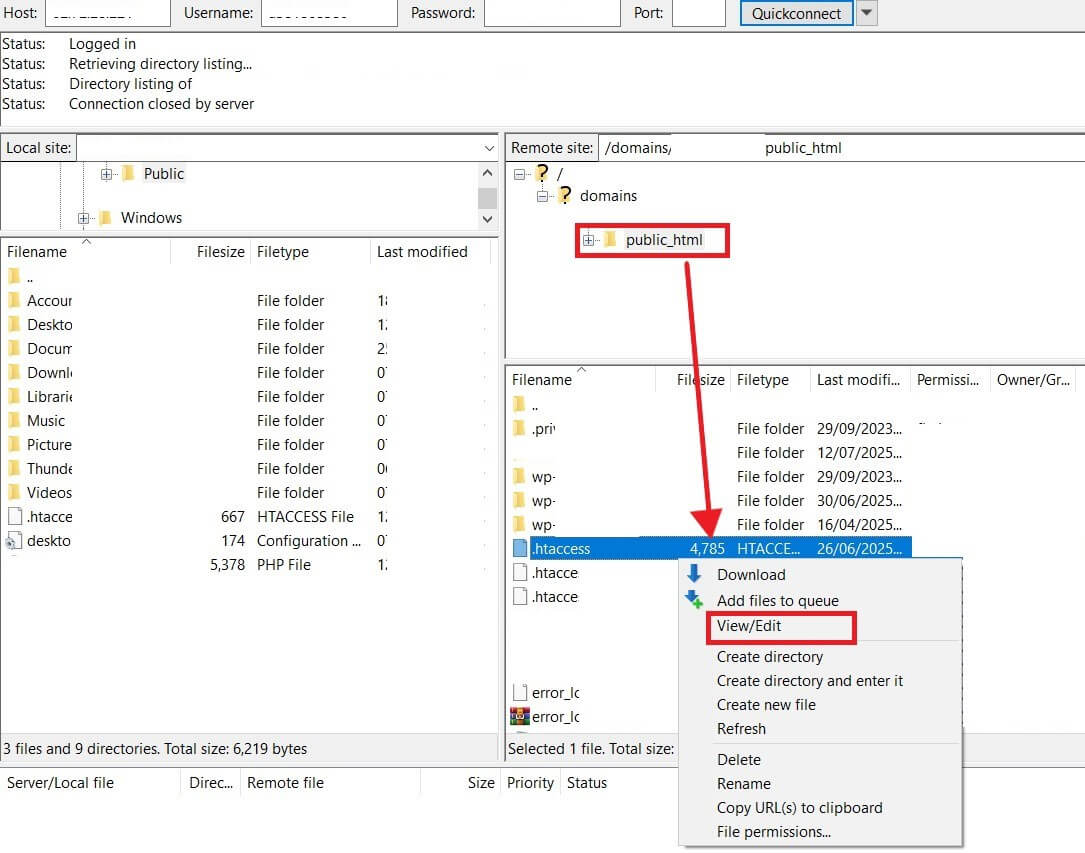
Add these lines below the last line:
Order Allow,Deny
Deny from 000.000.0.1
Allow from All
Replace 000.000.0.1 with the IP you want to block.
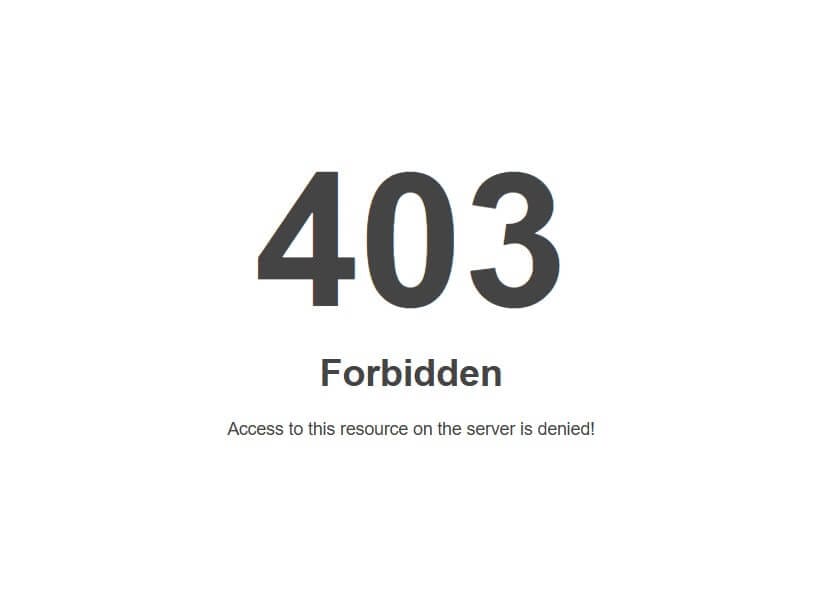
After blocking, the specific user will see 403 message:
6. Archive WordPress Content Instead of Deleting
If you have old content you no longer want public but don’t want to lose forever, consider archiving WordPress content. This is a great alternative to a full delete WordPress site action.
This way, the live site can be cleaned up or taken down while keeping a complete archive.
How to do it:
From your WordPress dashboard, go to ‘Tools’ -> ‘Export’. Choose to export ‘All Content’ or specific Posts, Pages, or Media. Click ‘Download Export File’.
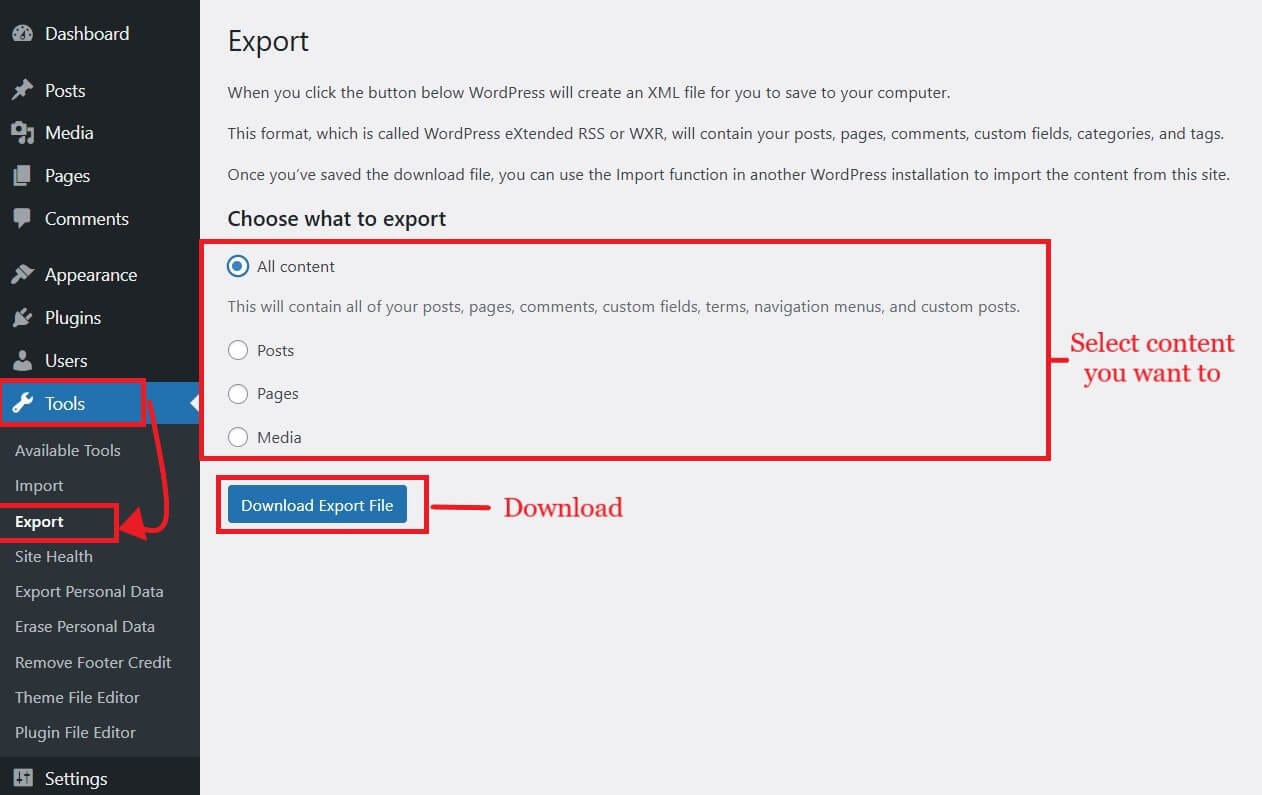
This will give you an XML file with all your content, images (references), and more. You can store this safely offline.
You can later install the XML file by navigating to Tools > Import.
7. Take Down or Delete Your WordPress Site (Permanent Removal)
This is the most drastic step. This is very different from simply choosing to unpublish WordPress site content.
If you truly want to delete your WordPress site permanently and ensure it’s gone from the internet, follow these steps. Be certain, as this is irreversible without a prior backup.
You can check our guide on how to back up WordPress site easily.
How to do it: (via Hosting Control Panel)
Access your hosting account and select the website you want to delete. Many hosts have one-click WordPress installers. Look for an option to “Uninstall” or “Delete” an existing WordPress installation. You will be asked to confirm your deletion. Confirm to proceed with the deletion.
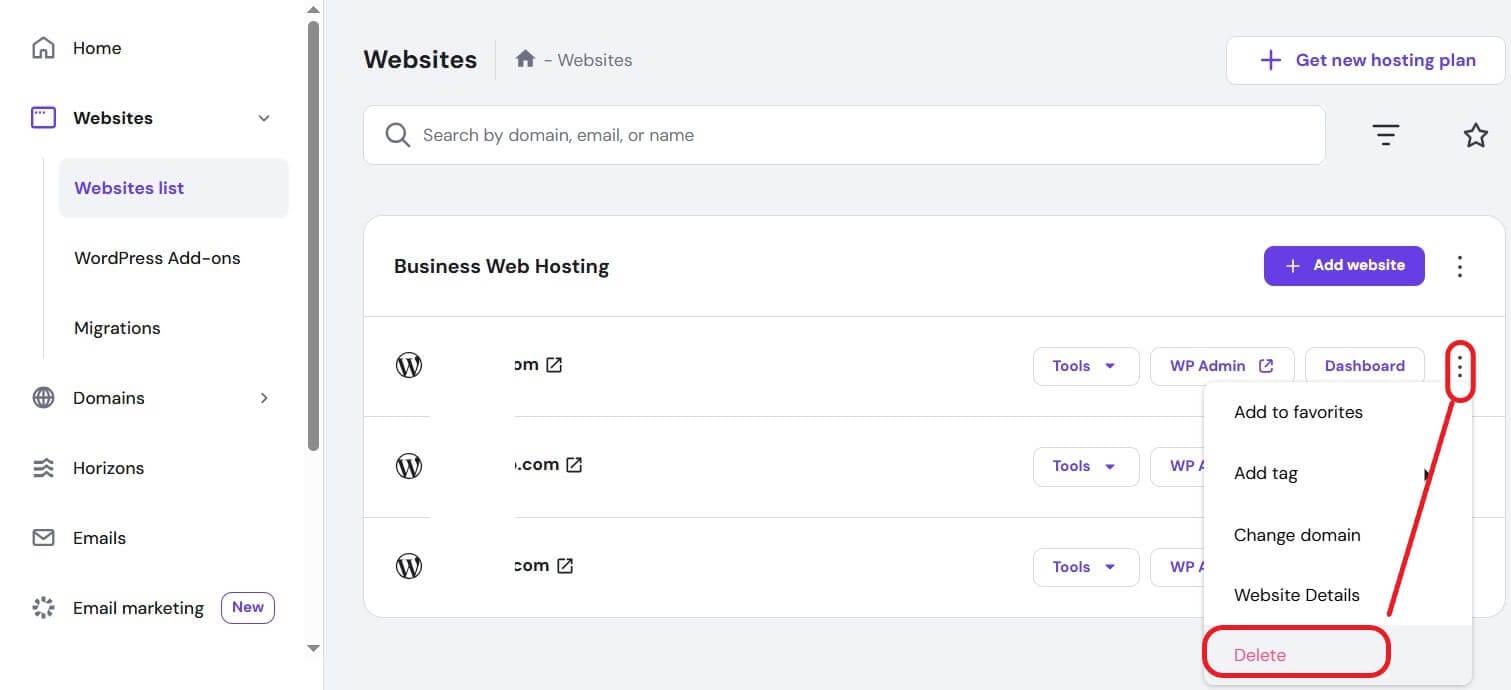
This is the easiest way to delete a WordPress site from your host.
How to do it: (Manually)
Access your site files using an FTP client, then right-click on the WordPress site’s directory (public_html) and select DELETE.
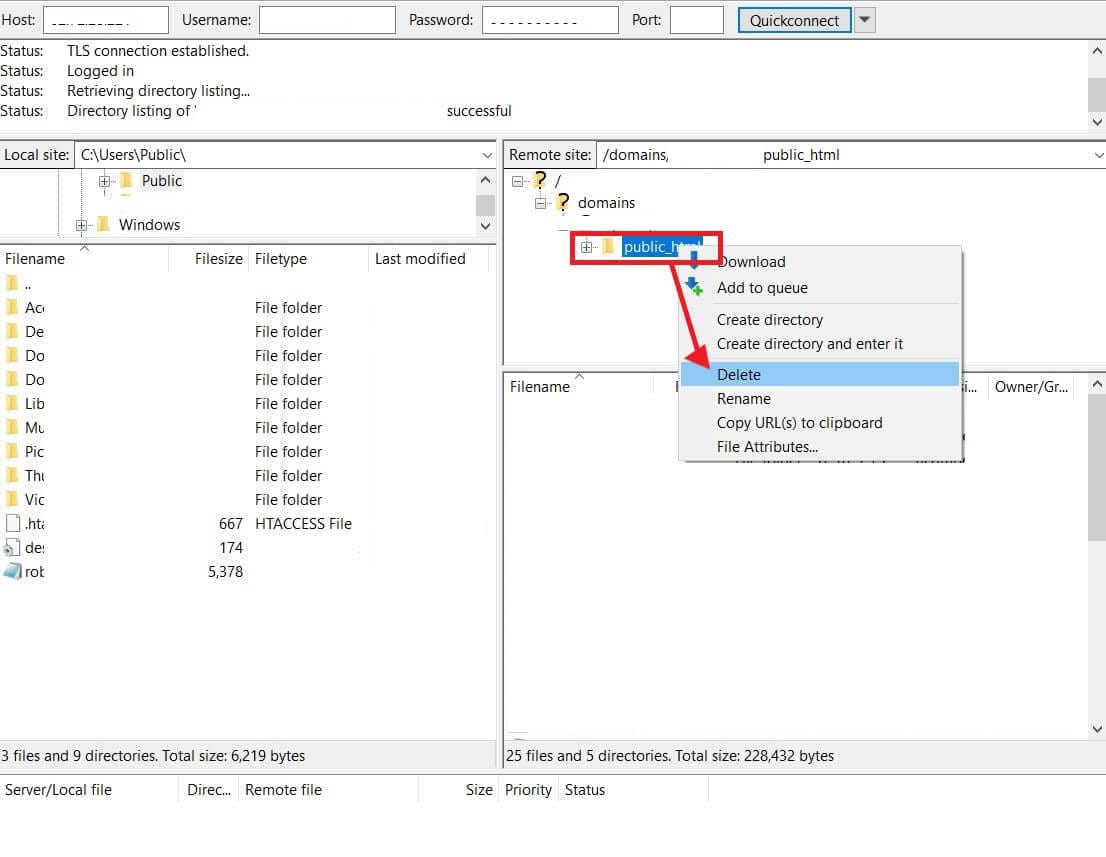
Don’t worry, we didn’t delete anyone’s site. We’re just here to show you how. 😅
REMEMBER: Deleting your site permanently will result in broken links and 404 page errors for anyone trying to access old URLs.
SEO Impacts When You Unpublish a WordPress Site
Unpublishing a site or content can have a significant SEO impact on the site. Don’t let your hard-earned rankings disappear!
- Update Internal Links: Go through your remaining content and remove or update any internal links pointing to the now-unpublished pages.
- For Temporary Unpublishing (Maintenance Mode, Password): Google generally understands temporary downtime. Keep it short.
For Permanent Content Removal:
- Implement 301 Redirects: This is critical. If you delete WordPress site content or move it, set up 301 redirects from the old URL to a relevant new page (like your homepage or a related category). This tells search engines the content has permanently moved and passes on “link juice,” preventing broken links.
- Google Search Console: If you’ve permanently removed URLs, you can use Google Search Console’s “Removals” tool to expedite their removal from Google’s index.
How to Republish Your WordPress Site
If you’ve only temporarily unpublished your site, bringing it back online is straightforward.
Disable Maintenance Mode
Open the “Maintenance” plugin from the WordPress Admin menu and disable it from the top.
You can turn off the Maintenance page in SeedProd by simply going to SeedProd -> Landing Pages and toggling Maintenance Mode to inactive.
Remove Password Protection
To disable password protection in the plugin, go to Password Protected in the WP dashboard and toggle the Password Protected Status to off.
Allow Search Engines
Re-check the “Discourage search engines from indexing this site” box in ‘Settings’ -> ‘Reading’ if you checked it previously.
If you used the robots.txt file, then simply remove the Disallow: / line. This will make this rule inactive. Save the changes.
Re-publish Posts/Pages
If you changed the status of any posts/pages to draft, password, or private. Simply change their status back to Published. Don’t forget to remove your Password or uncheck Private. Update it!
Unblocking IPs from the Site
Delete the lies you added in the .htaccess file for blocking IP addresses.
Frequently Asked Questions
Conclusion
Unpublishing a WordPress site can be done in many ways, from simple maintenance modes to advanced .htaccess restrictions. The right method depends on whether the goal is to temporarily unpublish WordPress, make a WordPress site private, or take down a WordPress site permanently.
Either way, always backup, consider SEO, and plan how to restore or republish later.
Did you find this guide helpful? Share your experiences or questions about unpublishing your WordPress site in the comments below! Don’t forget to share it with your loved ones.


