We all know how important it is for our websites to show up in search results. But sometimes WordPress site owners need to keep certain pages out of search results.
So, what is indexing? It’s how search engines like Google discover, crawl, and store your web pages. When someone searches, the results come straight from this huge digital library.
To de-index a page in WordPress, the noindex tag is used. In simple terms, adding a noindex tag means “please do not index this page.”
WordPress offers multiple ways to apply a ‘noindex’ to a page, from built-in settings to popular SEO plugins or manual code edits.
What Is a NoIndex Tag in WordPress?
A noindex tag (or directive) is a command given to search engines via HTML or HTTP headers, instructing them not to index a specific page.
In WordPress, this is usually implemented by adding a <meta name=”robots” content=”noindex”> in the page’s HTML head or by using a plugin that generates this tag automatically.
According to Google’s documentation, “noindex” is set through a <meta> tag or an X-Robots-Tag HTTP header to prevent indexing. It is important that the page remains crawlable; if the page is blocked by robots.txt, Googlebot can’t see the ‘noindex’ and the page may still be indexed.
You can also de-index the whole site, if you check Settings > Reading > Search Engine Visibility >
Discourage search engines from indexing this site.
Why De-Index Page in WordPress
You know, not every page on your WordPress site needs to be seen by search engines. Sometimes it’s smart to use noindex on certain pages!
This can actually boost your site’s SEO, make things smoother for visitors, and help Google crawl your site more efficiently. It’s all about showing Google what’s truly valuable.
Here are some common reasons why you might choose to de-index a page:
- Duplicate or thin content: Print-friendly versions of articles, author archive pages on a single-author blog, tag/category archives, or internal search result pages often duplicate other content. Indexing them can dilute SEO and confuse search crawlers.
- Thank-you or confirmation pages: After a user submits a form or makes a purchase, the “thank you” page adds no value for other visitors. Google’s algorithm expects such confirmation pages to be excluded, and indexing them can dilute your site’s relevance for target keywords
- URL parameters and searches: WordPress’s built-in search results (
?s=...), paginated content, or many URL variations often generate many near-duplicate pages. These are usually set to noindex by SEO plugins, and Google recommends excluding internal search results entirely - Custom Post Types or Taxonomies: Sometimes, plugins create post types (like “products” or “events”) or categories that you don’t want indexed. For example, a music blog might want to index “artists” but not every single “song” page if there are too many.
- Under Development Pages: If you’re still working on a page or it’s incomplete, it’s best to hide it from search engines.
- Attachment pages: By default, WordPress creates separate attachment pages for images and media. These thin content pages are typically set to noindex to avoid low-value pages in search results
- Private or user-only content: Membership pages, account screens, admin panels, or client dashboards should stay private, so blocking them from search results protects security and privacy.
Using SEO plugins like Yoast SEO or Rank Math SEO makes this strategic de-indexing much easier. They help you tackle common SEO challenges effortlessly.
Thinking strategically about what Google indexes, rather than simply indexing everything, is key. It’s all about ensuring only your most valuable content shines in search results!
Step-by-Step Methods To De-Index
Whether you want to hide a page or fix an accidental de-indexing intentionally, WordPress offers some great ways to control what search engines see. Let’s walk through the most effective methods, from simple settings to more advanced tricks.
1. Using WordPress’s Built-in Visibility Settings
This is a broad approach, perfect for hiding an entire development or staging site. It tells search engines to ‘noindex’ your whole site.
- First, log in to your WordPress admin area. Then, head over to Settings > Reading in the left sidebar.
- Scroll down until you spot the “Search engine visibility” option.
- To de-index your entire site, make sure the box next to “Discourage search engines from indexing this site” is checked.
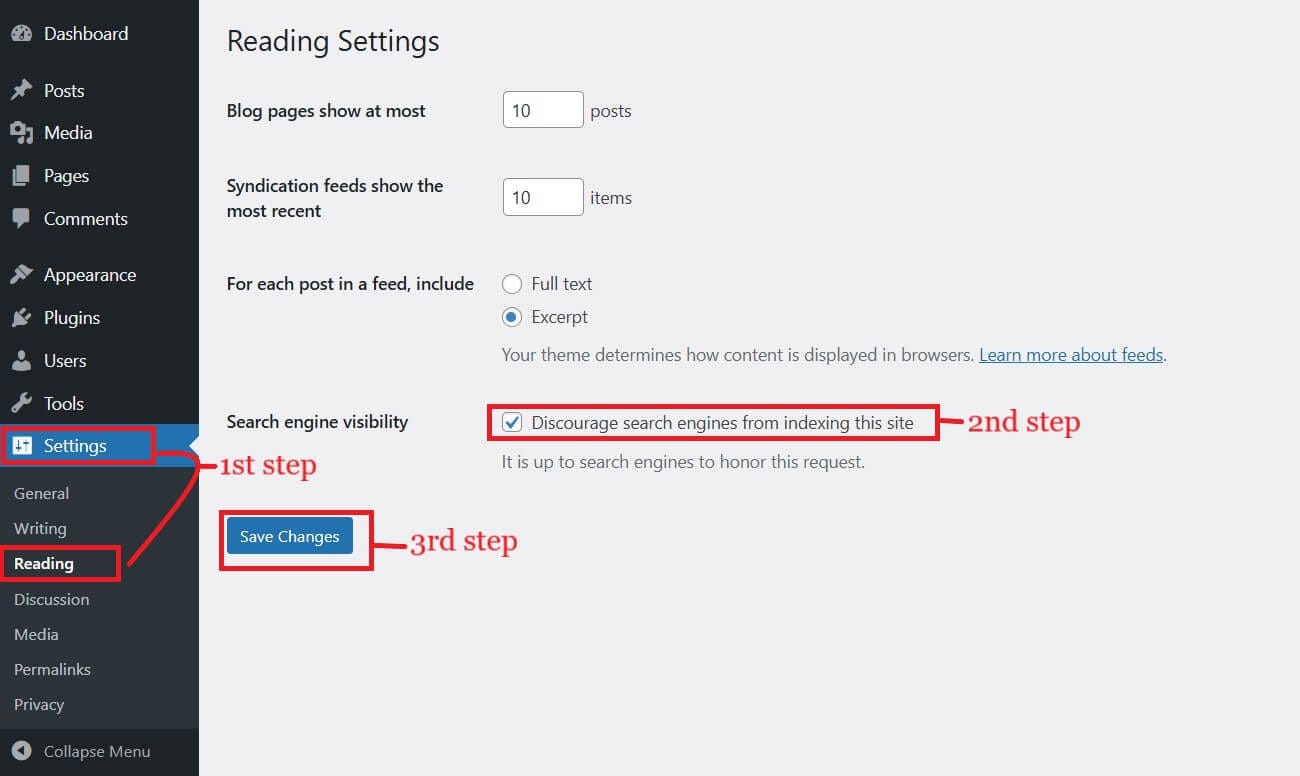
Don’t forget to click “Save Changes” to apply your settings.
This setting is super easy, but it applies a noindex tag to all your pages. It relies on search engines following the rule. It’s not ideal for hiding just a few pages on a live site.
2: Using SEO Plugins
For most WordPress users, an SEO plugin is the best way to manage indexing. They’re user-friendly and super efficient for handling pages or content types.
These plugins make complex code editing a breeze! The popularity of these plugins shows how much easier they make tricky SEO tasks compared to manual coding.
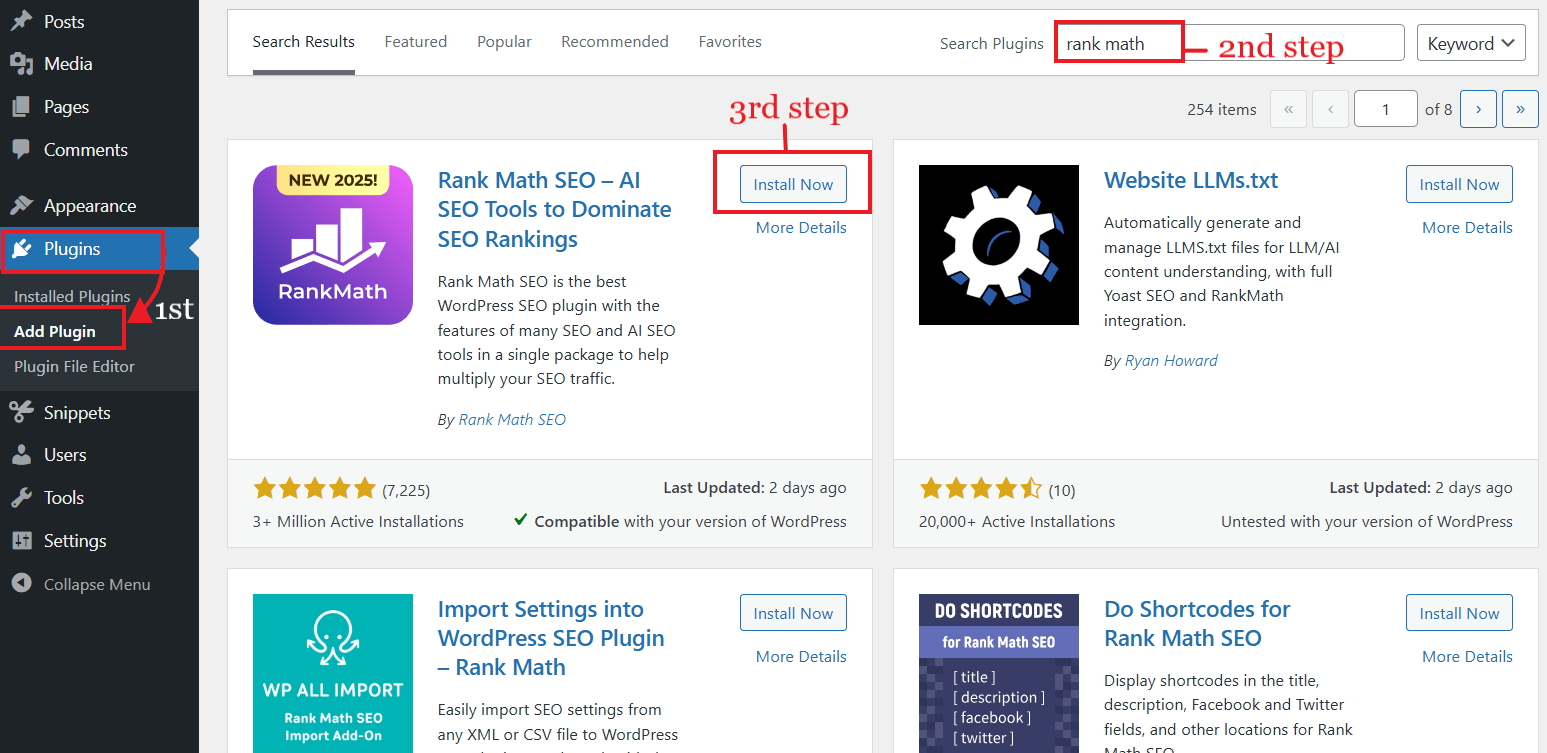
First, install and activate your preferred SEO plugin (we use Rank Math).
For Individual Posts/Pages:
Go to your WordPress dashboard and edit the specific post or page you want to de-index.
Open the editor of the post or page.
Open the Rank Math SEO plugin’s tab in the editor(located on the left sidebar). Open the “Advanced” tab.
Find the option like “No Index” under the ROBOTS META tab and select it.
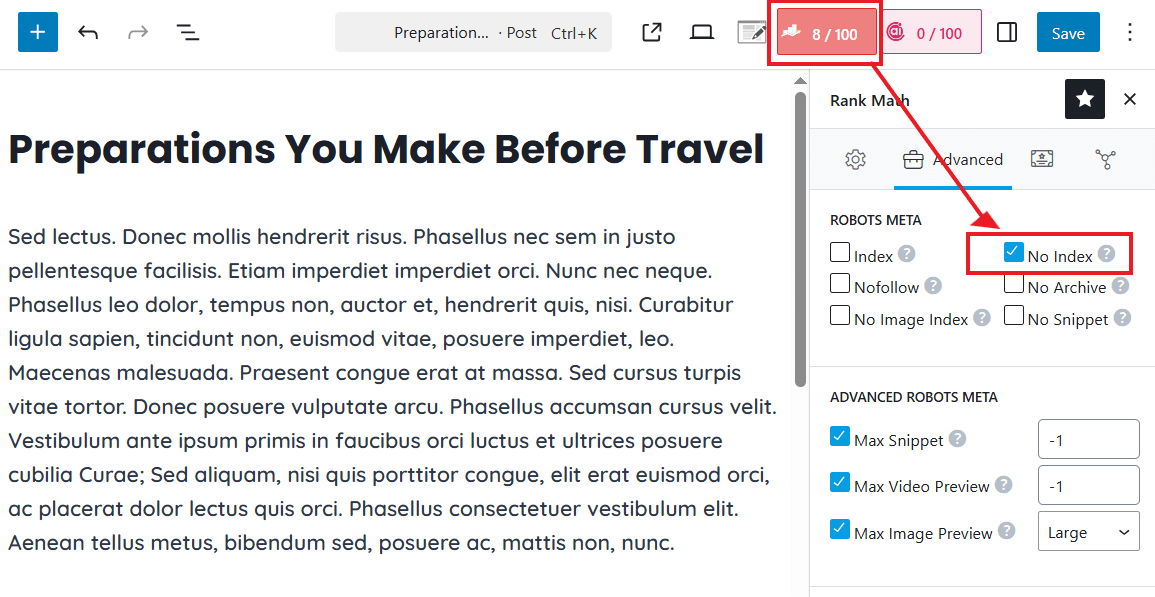
In the Yoast SEO, the option will be “Allow search engines to show this content in search results,” and select No from the dropdown.
Remember to click “Save” in the editor to save your changes!
Tip: Yoast SEO often sets noindexed pages to noindex, follow by default. This means Google won’t show the page, but it will still follow its links to find other content.
For Entire Content Types, Taxonomies, or Archives:
From your WordPress dashboard, go to Rank Math > Titles & Meta.
You can noindex each type of content. There are tabs for “Authors”, “Misc Pages”, “Attachments”, “Categories”, and “Tags”. In these sections, you’ll find options to enable “No Index” for each in the Robots Meta.
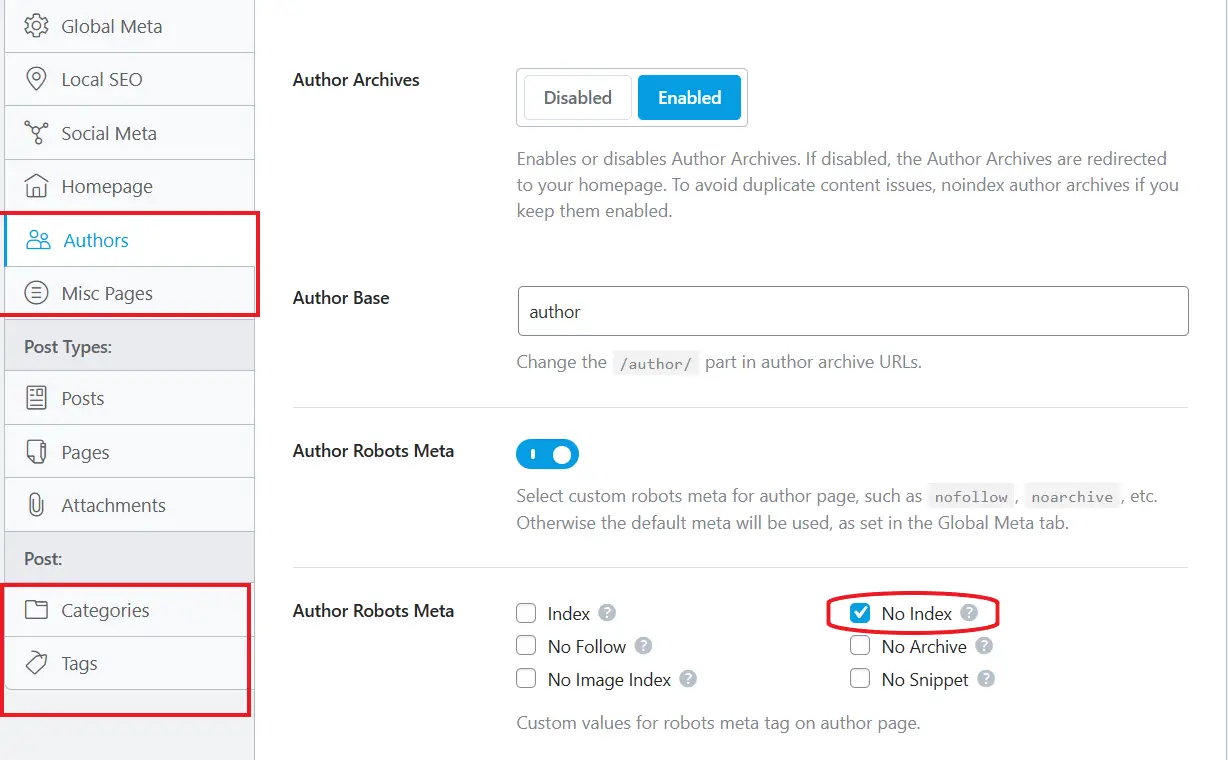
This makes it super easy to de-index all author archives, or specific pages, categories, and tags across your whole site.
The steps are similar if you use other SEO tools. Look for “Meta Robots” or “Index” settings on the page. The key is to apply the noindex directive to individual content.
3. Utilizing the X-Robots-Tag HTTP Header
This method is very useful if you are a professional coder. This is for noindexing any files type.
The X-Robots-Tag gives you even more control than meta tags, especially for non-HTML files. Instead of being in the HTML, it’s an HTTP response header your server sends to crawlers.
To apply noindex using the X-Robots-Tag HTTP header in WordPress, you need to add some code to your site’s server configuration:
Go to your site root directory using FTP or cPanel → open the ‘.htaccess’ file.
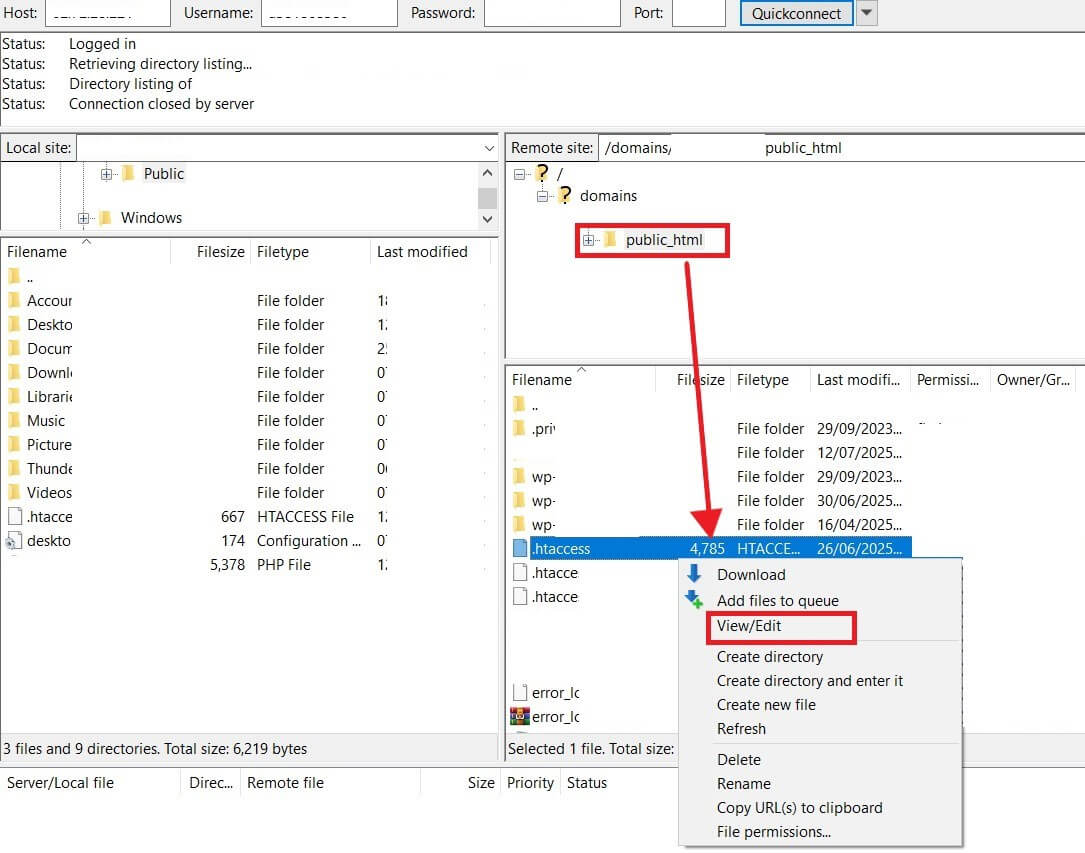
Add this code at the end (for example, to block PDF files from indexing):
<FilesMatch "\.pdf$">
  Header set X-Robots-Tag "noindex, nofollow"
</FilesMatch>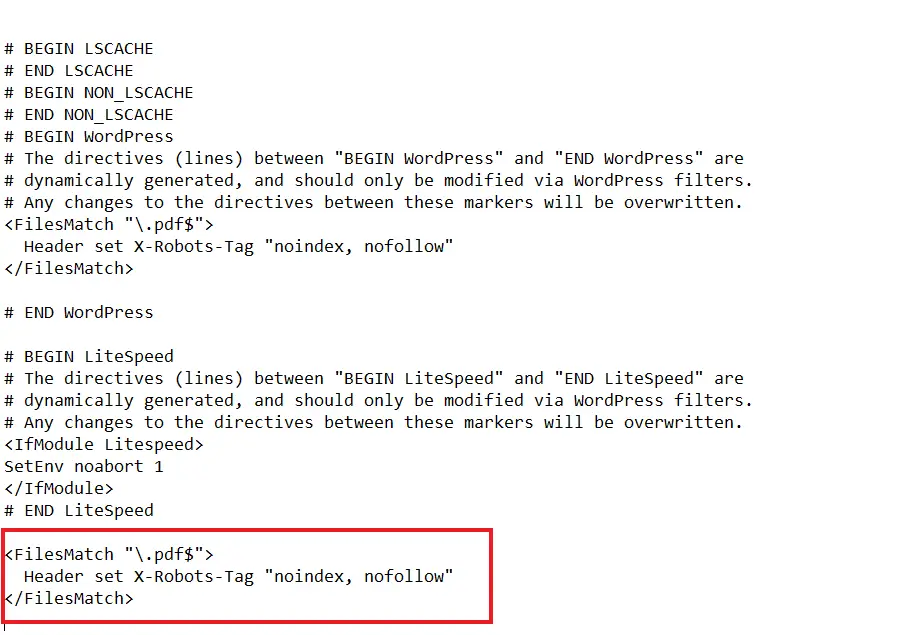
You can adjust this for other file types (like .docx, .zip, .jpg, etc.).
4. Using Robots.txt file
The robots.txt file is a special file used to control how search engine bots (like Googlebot, Bingbot, etc.) crawl and index your website. It tells bots which parts of your site they’re allowed or not allowed to access.
You can edit your robots.txt file directly via FTP or your hosting’s File Manager. Many SEO plugins, like Yoast SEO, also have a built-in editor for it.
You just have to put Disallow: /page-slug/ below the line, like “Disallow: /wp-admin/”. Replace page-slug with the actual slug of your page or post.
You can see the applied changes by searching “https://yourdomain.com/robots.txt” in your browser. Replace yourdomain.com with your web’s domain.
If a page is disallowed in robots.txt but linked elsewhere, Google might still find and index the URL. It just won’t crawl the content.
This often leads to a “URL without description” in search results, which isn’t what you want for de-indexing. This is a big misconception! Google clearly states that:
Disallow in robots.txt won’t prevent indexing if external links exist.
When to Use robots.txt:
- To stop crawlers from accessing unimportant or very similar pages (like internal scripts or staging areas).
- To block resource files like specific images or scripts if they don’t drastically change your page’s look.
- To keep image, video, and audio files out of Google Image or Video Search.
(Optional) Remove Page with GSC’s URL Removal Tool
This tool is for quickly, temporarily removing specific URLs from Google’s index. It’s often used after you’ve already added a “noindex” tag or fixed an indexing issue.
How it Works: You simply ask Google through your Search Console account to temporarily hide a URL. Google usually processes these requests pretty fast.
You can read more about the Removal Tool here→.
Steps (Quick overview):
Make sure your WordPress site is verified in Google Search Console. In GSC, go to the “Removals” section and click “New Request”.
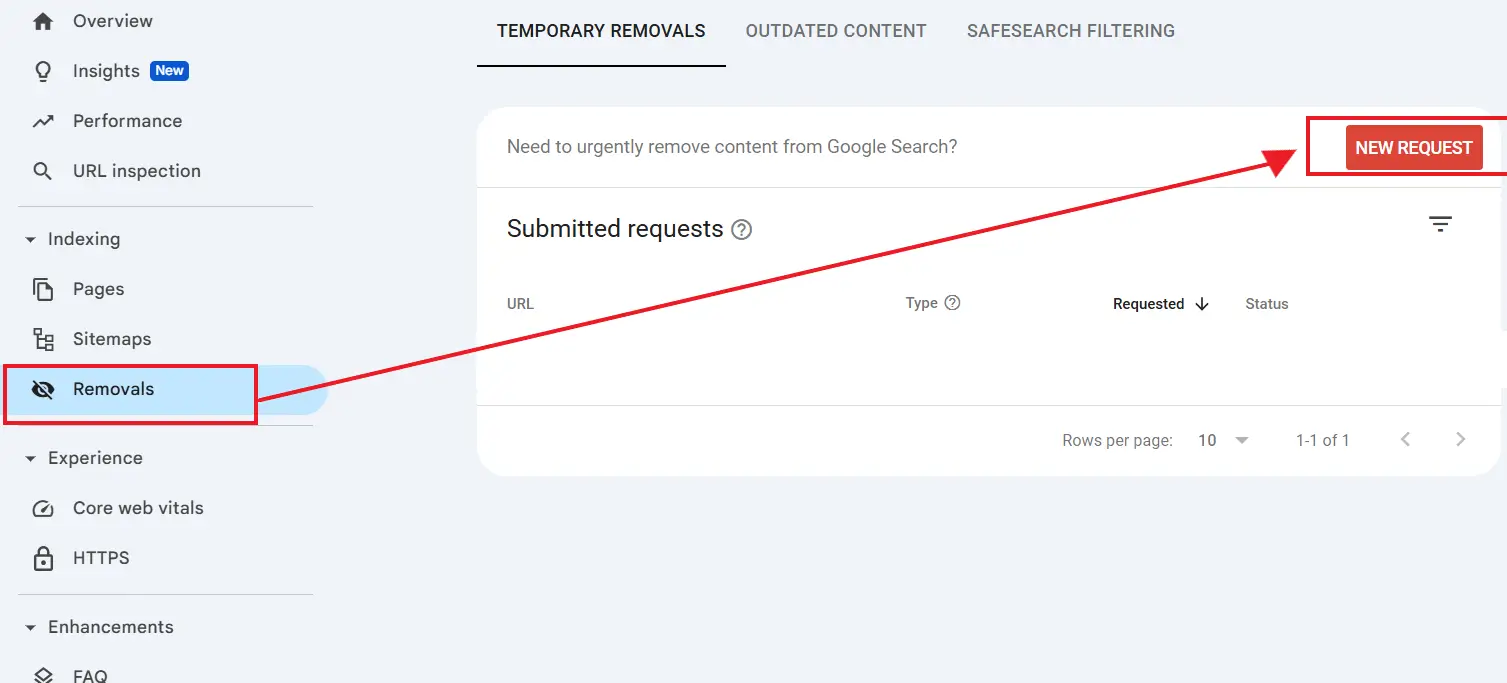
Submit the URL you want to temporarily remove.
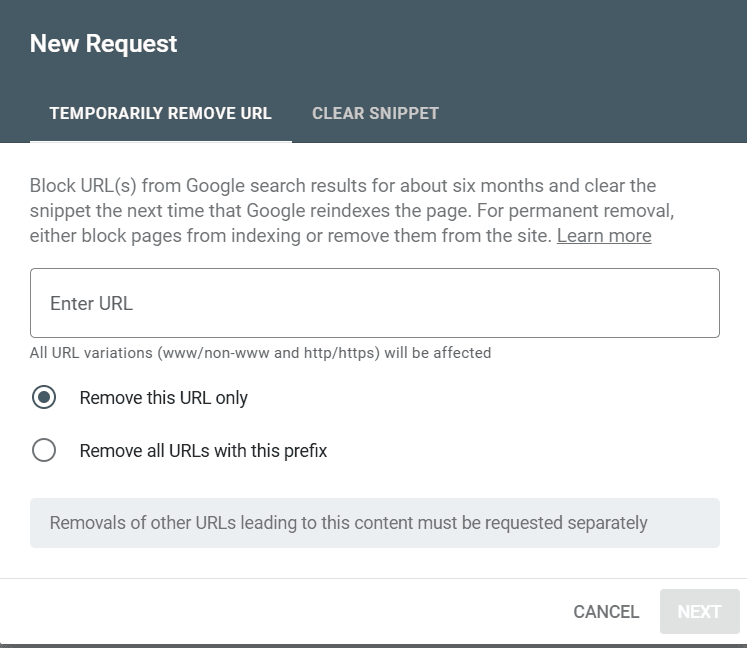
Remember, this is just a temporary fix, usually for about 6 months.
Best Practices for Managing Indexing in WordPress
Managing your WordPress site’s indexing isn’t just about fixing problems; it’s about staying proactive to keep your site visible!
- Regularly Review Indexing Status: Don’t just set it and forget it! Periodically check Google Search Console’s Page Indexing report. Use the URL Inspection tool to make sure your desired pages are indexed and unwanted ones are not. This helps catch issues early.
- Understand noindex vs. disallow: This is super important! Remember the key difference: ‘noindex’ stops a page from showing in search results. ‘Disallow’ in robots.txt only prevents crawlers from accessing a page. Never rely on disallow alone to hide pages, as it can lead to partial indexing.
- Prioritize User Experience and Content Quality: Google’s algorithms are getting smarter! They love sites that offer real value and a great user experience. High-quality, unique content is less likely to get de-indexed and more likely to rank well.
- Maintain a Clean XML Sitemap: Your XML sitemap is like a treasure map for search engines. Make sure it only includes URLs you want indexed and has no errors. Update and submit it to Google Search Console regularly.
- Use SEO Plugins Wisely: These plugins, like Yoast SEO, Rank Math, or AIOSEO, are fantastic for managing indexing. But always understand what settings you’re applying to avoid accidental issues.
- Stay Updated with Google’s Guidelines: Search engine rules are always changing. Make it a habit to check Google Search Central for the latest tips and recommendations.
Conclusion
With this guide’s tips and tools, from simple WordPress settings and awesome SEO plugins to advanced meta tags and Google Search Console, you’re now ready to confidently control your site’s visibility.
Just remember, the ‘noindex’ tag is your go-to for removing content from search results. Robots.txt is for managing crawler access, which is a different job. Mixing these up is a common mistake that can cause indexing headaches!
Don’t let indexing problems hold your website back. Use these methods, keep an eye on your site’s performance in Google Search Console, and stay foresight with your WordPress SEO. Your site’s visibility is totally in your hands.
We hope you found this post helpful. If you liked this article or we covered what you were looking for, please consider sharing it with others who might benefit.


