Have you ever dreamed of earning money from your passion? Perhaps you spend your free time creating unique jewelry, designing handcrafted pottery, or writing compelling ebooks. But setting up a complicated online store might hold you back.
Don’t worry, WooCommerce is here to make the process easier and enable you to effortlessly sell your products on the internet, regardless of what you sell.
Whether you’re a craftsperson, digital product creator, or anything in between, WooCommerce provides a user-friendly platform to display your products and turn website visitors into paying customers.
Just install WooCommerce and turn your website into an online store. Don’t know how to do it? Don’t worry, this guide will equip you with all the knowledge you need to install and setup WooCommerce to let you sell your amazing creations online.
What is WooCommerce?
WooCommerce is a freemium plugin specifically designed for WordPress websites. This free plugin seamlessly integrates with WordPress, giving you the power to sell a wide range of products, from physical items like handcrafted jewelry or clothing to digital downloads like ebooks, music, or software.
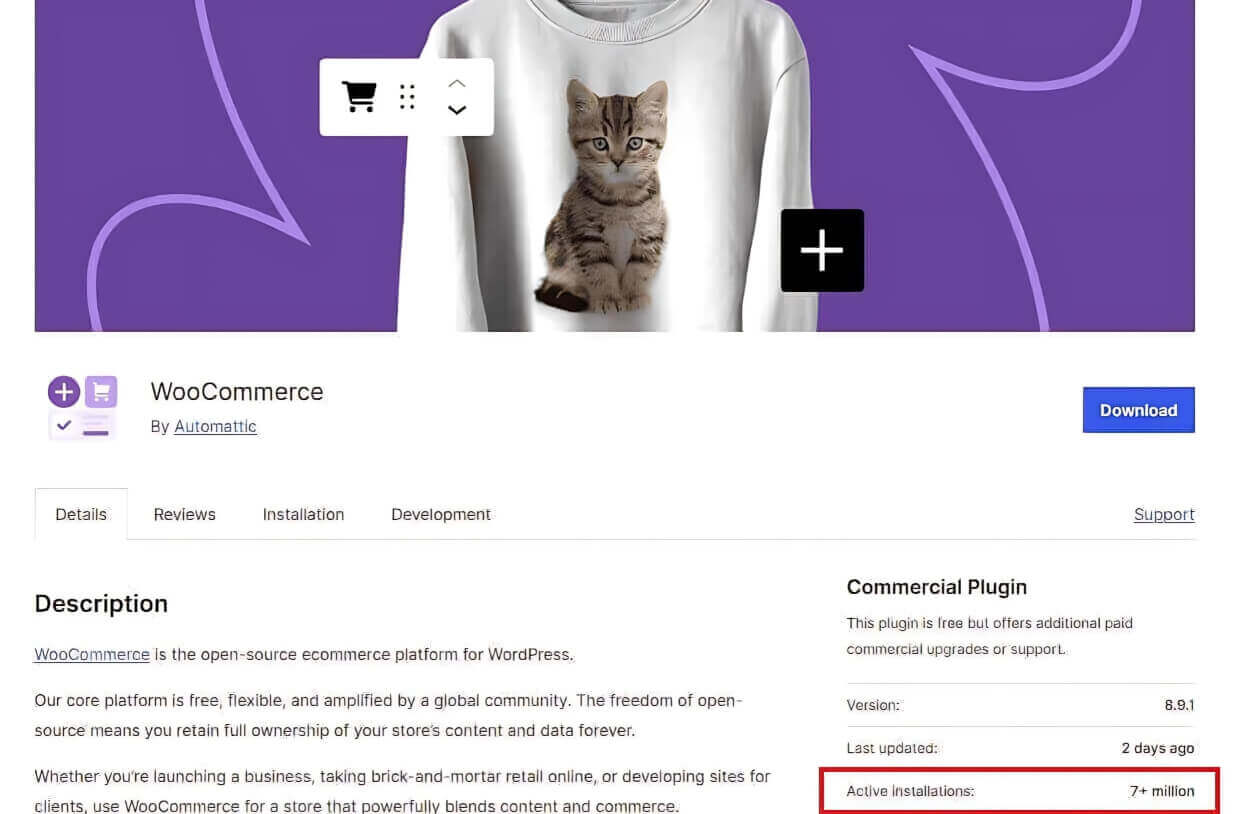
No matter what you create or dream of selling, WooCommerce empowers you to turn your passion into a profitable online business. It’s no wonder it’s a frontrunner in the e-commerce arena, boasting over 7 million active stores, capturing a significant chunk (more than 35%) of the global e-commerce market share.
What You Need to Launch Your WooCommerce Store?
before you open your virtual doors, ensure you have these foundational elements in place:
- Domain Name & Hosting: Your online address and your store’s home! Choose a memorable domain name and a reliable web hosting provider with features like good uptime, security, and scalability.
- SSL Certificate: Build trust with your customers! An SSL certificate encrypts data transmission, safeguarding customer information and financial details during transactions.
- Legal Documentation: Get your house in order! Secure business licenses, tax IDs, and a clear privacy policy to ensure legal compliance.
- Technical Knowledge (Optional, But Helpful): No coding is required, but some comfort with WordPress navigation, content creation, and managing plugins is helpful.
- Resource Allocation: Building an online store takes dedication. Budget time, money, and potentially personnel for setup, maintenance, and marketing.
Bonus Tips:
- Product Inventory: Know what you’re selling! Have a clear understanding of your product range and stock levels.
- Backup Solution: Be prepared for anything! Implement a reliable backup system to safeguard your store’s data. You can read our helpful guide on WordPress backups.
- Testing Environment: Test before you launch! Set up a testing site to experiment with features and ensure smooth WooCommerce integration.
By addressing these essentials, you’ll be well-equipped to launch your WooCommerce store with confidence. Remember, a solid foundation is crucial for a thriving online business.
How to Install WooCommerce on WordPress?
Note: In this tutorial, we will use all beta functionalities.
Ready to take the first step towards turning your passion into profit? Here’s a quick guide to get you started on your exciting WooCommerce journey:
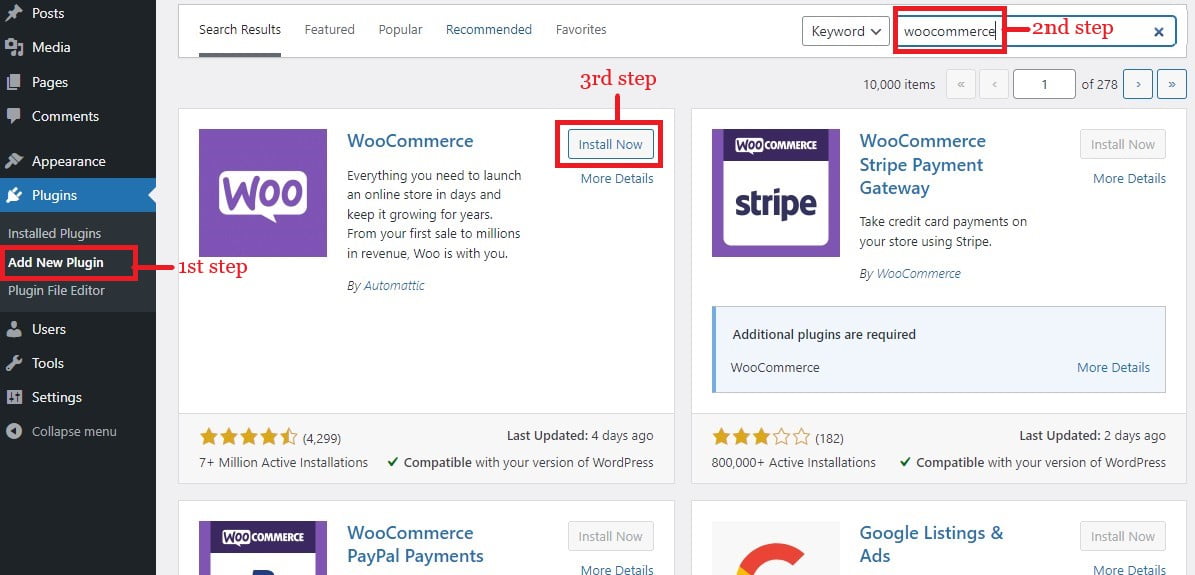
1. Install WooCommerce on WordPress:
- Login to your WordPress dashboard.
- Navigate to Plugins > Add New.
- Search for “WooCommerce” and install the plugin by clicking “Install Now” and then “Activate.”
2. Run the Setup Wizard:
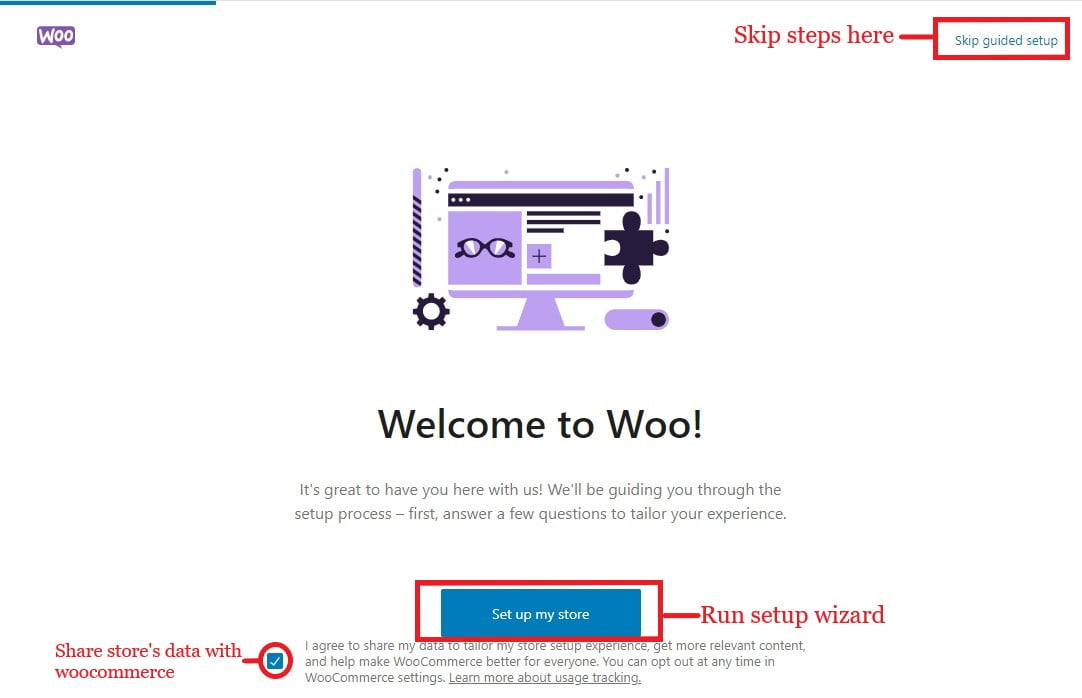
- After activation, you’ll be redirected to the Welcome page of WooCommerce.
- You can also skip their setup wizard.
- It’s totally up to you to share the store’s data by checking the box at the bottom.
- We will run the setup wizard right away.
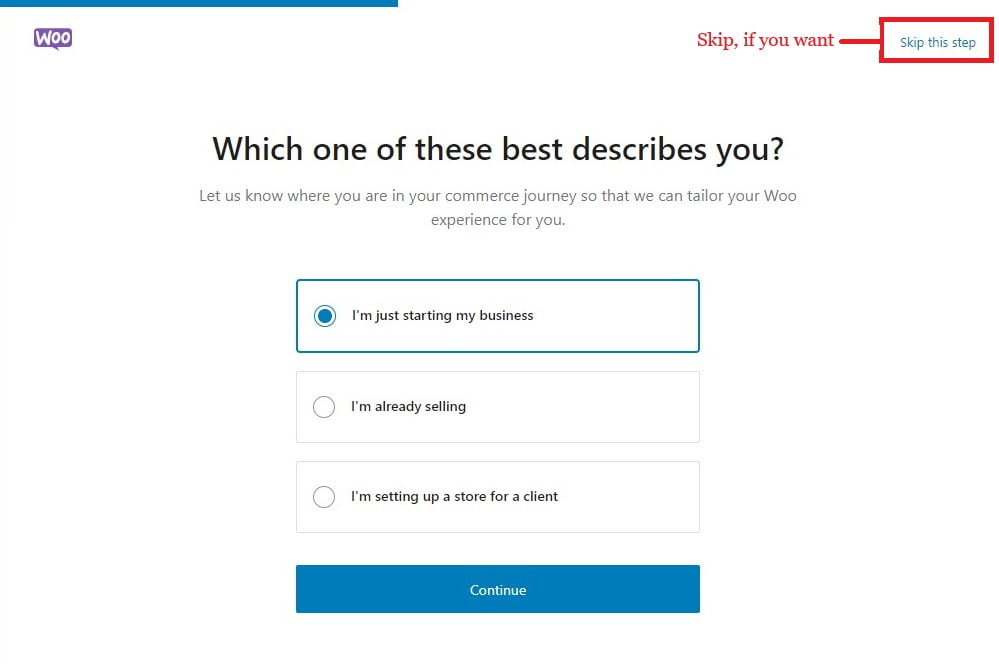
3. Which one of these best describes you?
This step lets WooCommerce tailor its recommendations based on your experience level: (you can always skip the steps)
- I’m just starting my business: Choose this if you are just starting an e-commerce journey with WooCommerce.
- I’m already selling: Choose this option if you run an offline or online store using any platform.
- I’m setting up a store for a client: This choice is ideal if you’re a developer or agency setting up WooCommerce for a client.
We’ll select “I’m just starting my business” as it’s a beginner guide and click on “Continue”.
4. Tell us a bit about your store:
Remember: You can’t skip this step
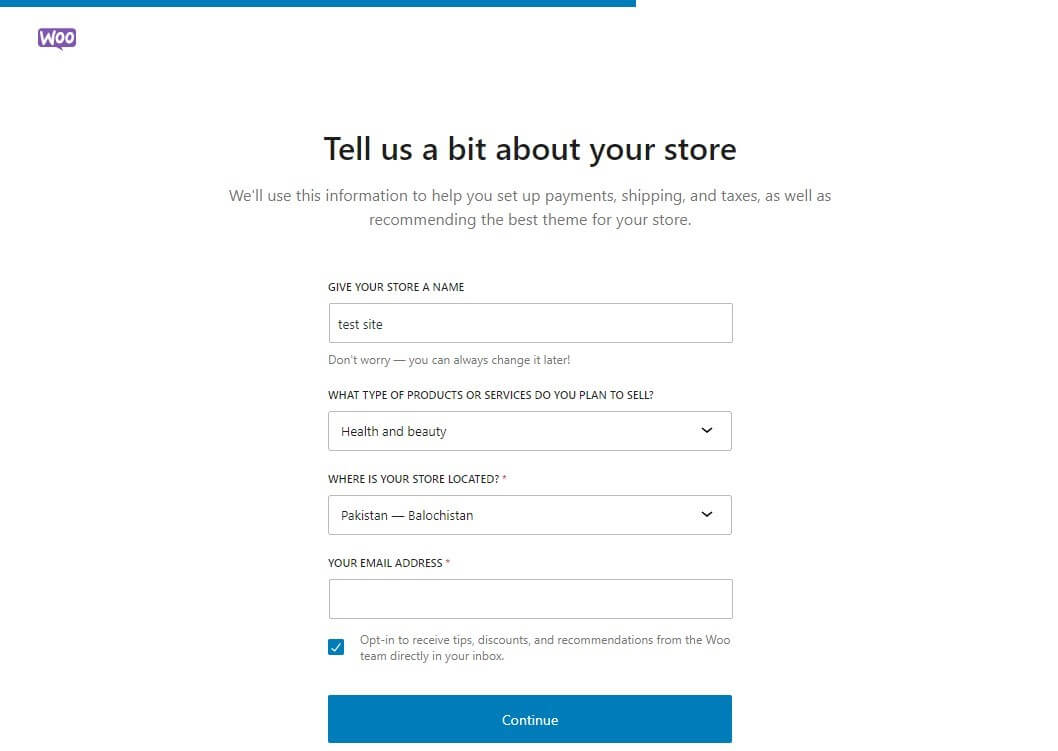
- Give Your Store a Name: Choose a catchy and memorable name that reflects your brand and products. Don’t worry, you can always change it later if needed.
- What type of products or services do you plan to sell?: Briefly describe the types of products you’ll be offering. This helps WooCommerce recommend relevant features or plugins.
- Where is your store located?: Enter your country and main business location. This helps with things like currency and tax settings.
- Your Email Address: Provide a valid email address where WooCommerce can send you important updates and notifications.
- Check box(Optional): Checking this box adds you to WooCommerce’s email list for store management tips, promotions, and extension recommendations.
5. Get a Boost with Our Free Features:
This step presents a curated selection of free plugins and integrations that can elevate your store’s functionality:
- Boost content creation with Jetpack AI Assistant (Optional): This plugin uses AI technology to assist with content creation for your blog posts and product descriptions.
- Showcase your products with Pinterest (Optional): This integration allows you to connect your store with Pinterest, making it easier to showcase your products to a large, engaged audience.
- Reach your customers with MailChimp (Optional): This integration connects your store with MailChimp, a popular email marketing platform, enabling you to create targeted email campaigns and recover abandoned carts.
- Drive sales with Google Listings & Ads (Optional): This option lets you leverage Google Listings & Ads to create free product listings and potentially reach millions of active shoppers on Google Search and other Google properties.
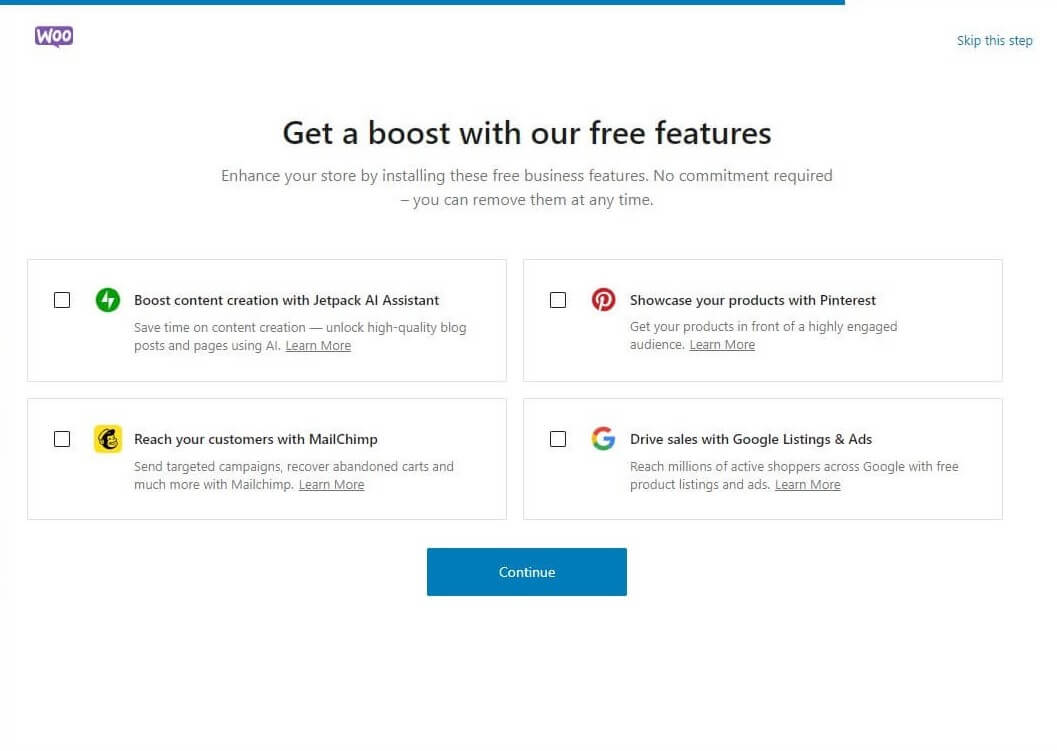
Remember: You can choose to install them all, some of them, or none of them based on your needs and preferences.
Congo🎉, Your WooCommerce is ready as per the details you provided in the above steps. Now you need to start customizing the store. Always remember, you can skip all setup steps by clicking Skip guided setup in the first step.
How to Set Up a WooCommerce Store?
Woohoo! Installation complete! You will be redirected to the WooCommerce dashboard, packed with 5 easy steps to transform your store into a sales machine.
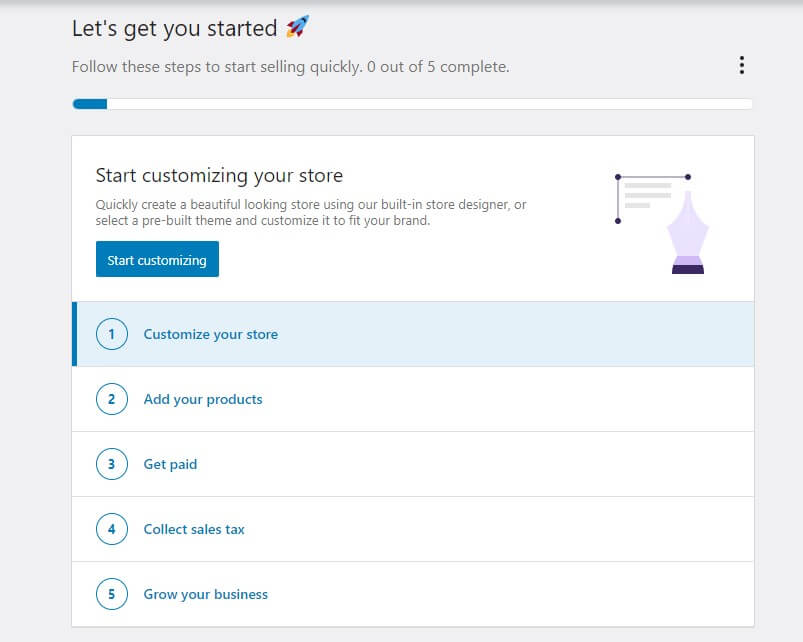
Here’s a breakdown of the five essential steps to guide you from setting up shop to attracting customers and achieving success:
1. Customize your store:
Leave this step if you’ve already a beautiful theme or if you don’t need Woo’s official theme.
First impressions matter! Choose a theme that reflects your brand and creates a visually appealing shopping experience. If you don’t want to start with Woo’s official themes. Here are 3 feature-rich free themes to elevate your online shop:
- KadenceWP: Think “WooCommerce BFF.” KadenceWP integrates seamlessly, making setting up your store a breeze. Plus, it’s got built-in features and keeps things lightning fast so your customers don’t get hangry waiting for pages to load.
- Astra: This theme’s all about speed – it’s like your store is on nitro! Plus, you can customize it like crazy to truly reflect your brand’s awesomeness. And of course, it works perfectly with WooCommerce.
- GeneratePress: Another speed demon, GeneratePress gives you the ultimate flexibility to design a one-of-a-kind store. It also integrates flawlessly with WooCommerce, making it a total winner.
2. Add your products:
There are 5 types of products shown as options:
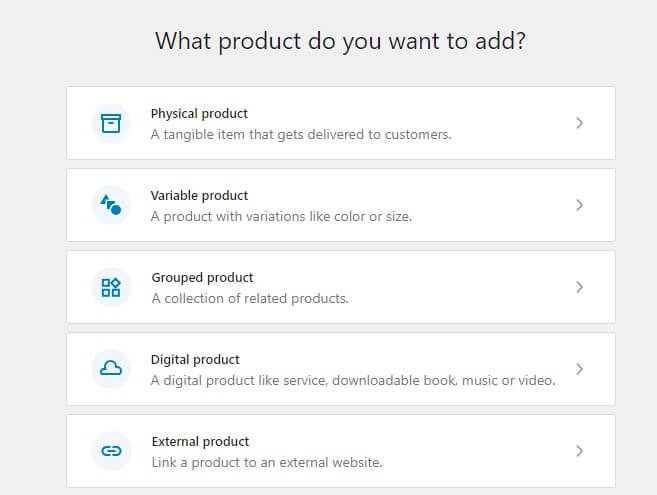
- Physical Products: Think t-shirts, mugs, or anything you ship to customers.
- Variable Products: These have options like size or color (think clothes with different sizes).
- Grouped Products: Sell bundles! Like a “Backyard Fun Pack” with a frisbee, beach ball, and jump rope.
- Digital Products: Ebooks, music, software – anything downloadable.
- External Products: Link to products on another website, like if you have a separate art store. Commonly this option is used for affiliate products.
We’ll upload the Physical product. After clicking on Physical product, you will be redirected to a beautiful product form(beta version).
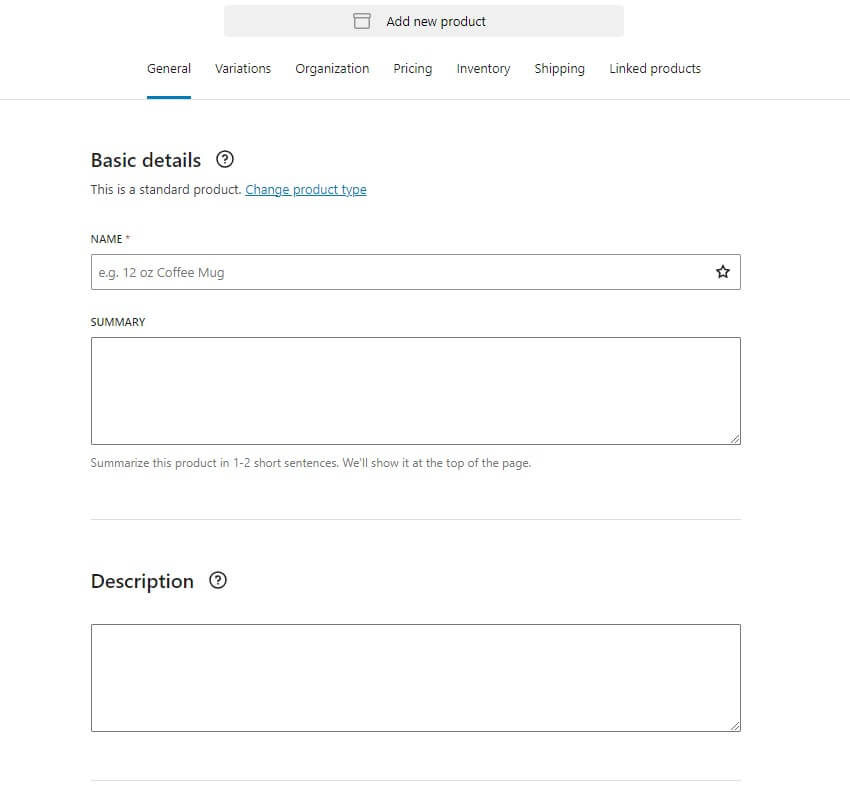
General>Basic Details:
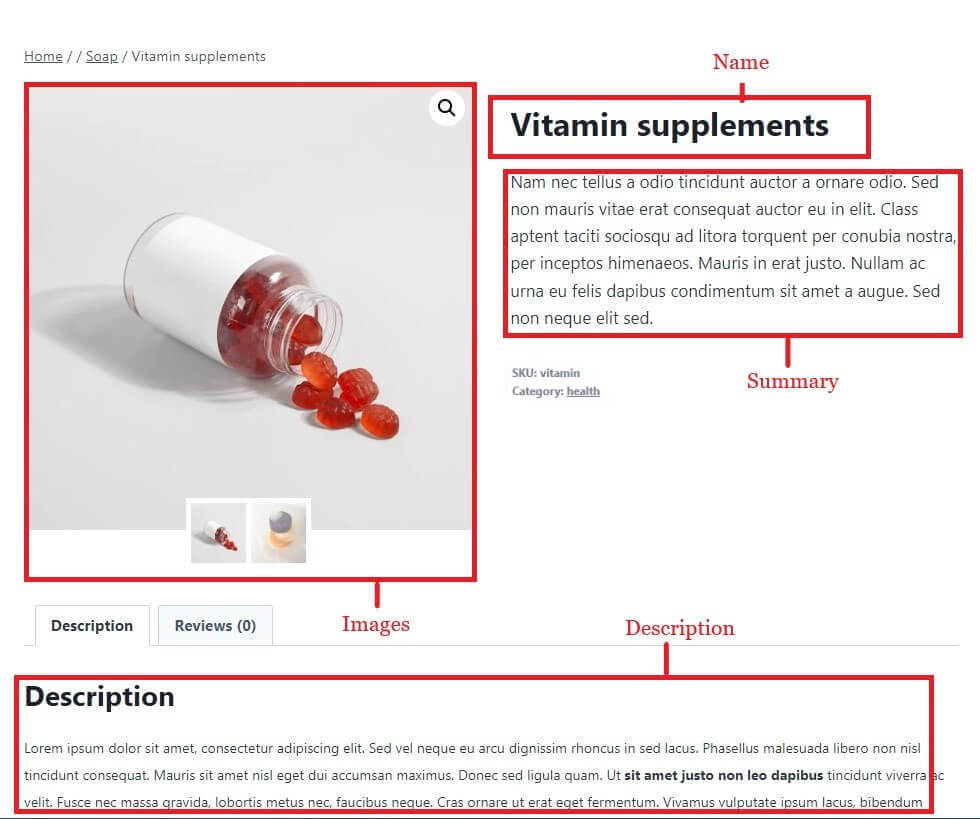
- Name: Write the product name here. You can also mark the product as a Featured Product by clicking on the star on the left.
- Summary: It’s a small intro about the product shown on the right side of the image.
- Description: Here briefly describe your product. When you click on it, you will see an option to open the Block editor and edit as you edit in Gutenberg.
- Images: Add images for your product. Try to upload high-quality images and short videos because nobody reads text anymore.
For a deeper insight, let’s have a look at this image:
Variations:
Since we are uploading a simple product, we will quickly view the variations tab(not in detail).
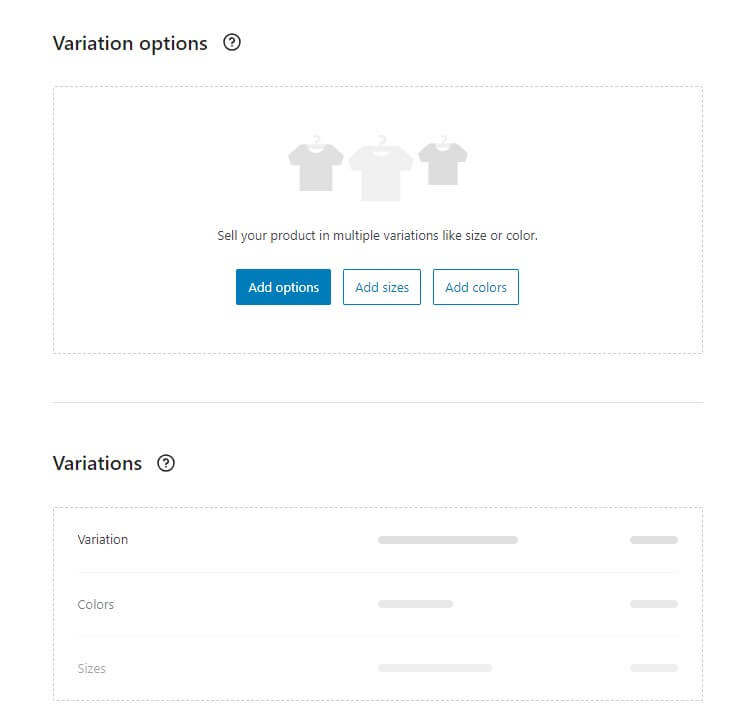
Variation options:
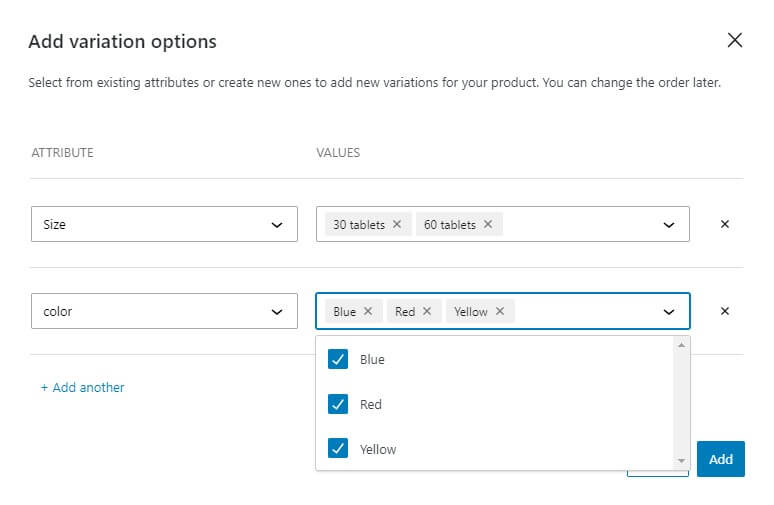
Clicking on Add options allows you to choose from existing attributes or create new ones to define the variations for your product.
Once you define the variation options (like size and color), the system automatically generates all possible variations based on those selections. This saves you time compared to manually creating each variation.
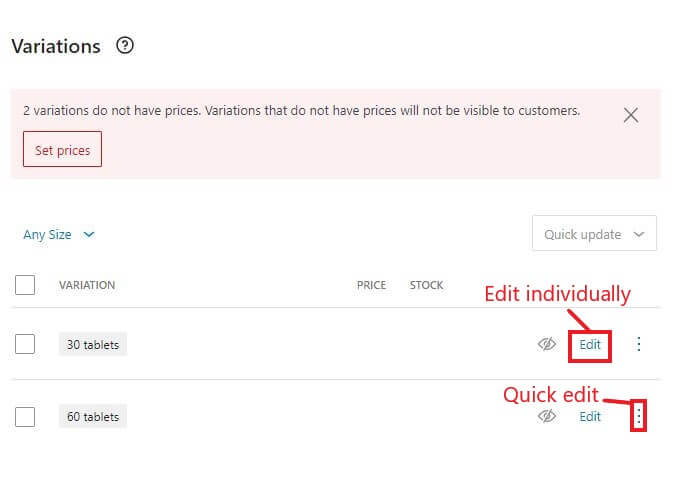
After creating variation options, you can edit each variation by clicking on Edit on the variation option or you can quickly edit by clicking on the three dots toggle button.
After clicking on Edit, you will be presented with 4 tabs allowing you to add details to variation.
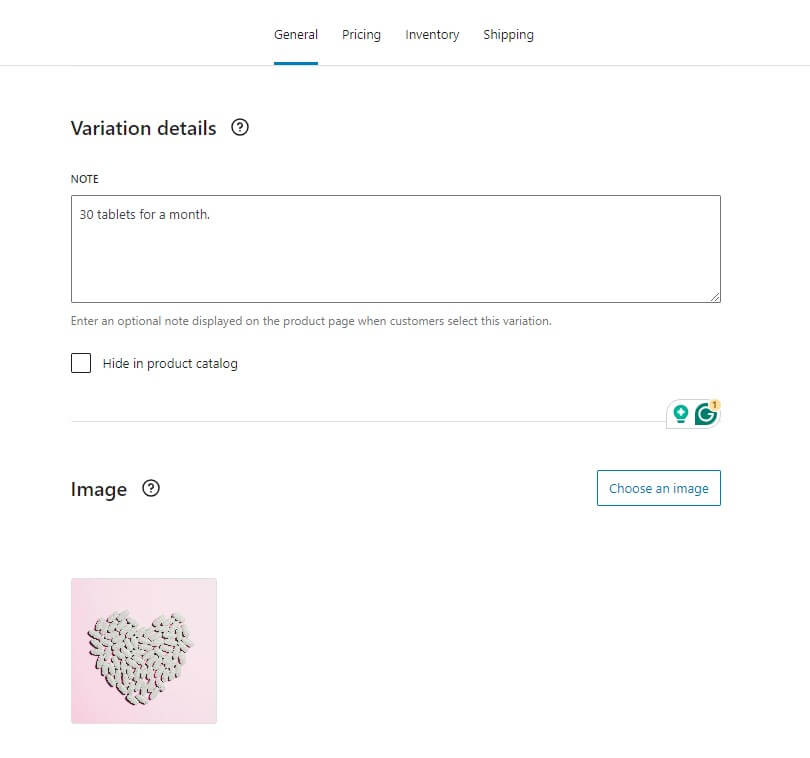
General: Customize details and images displayed for each variation.
Pricing: Setlist/sale prices and tax class for each variation.
Inventory: Manage stock levels specifically for each variation.
Shipping: Define shipping class, dimensions, and weight for each variation (if applicable).
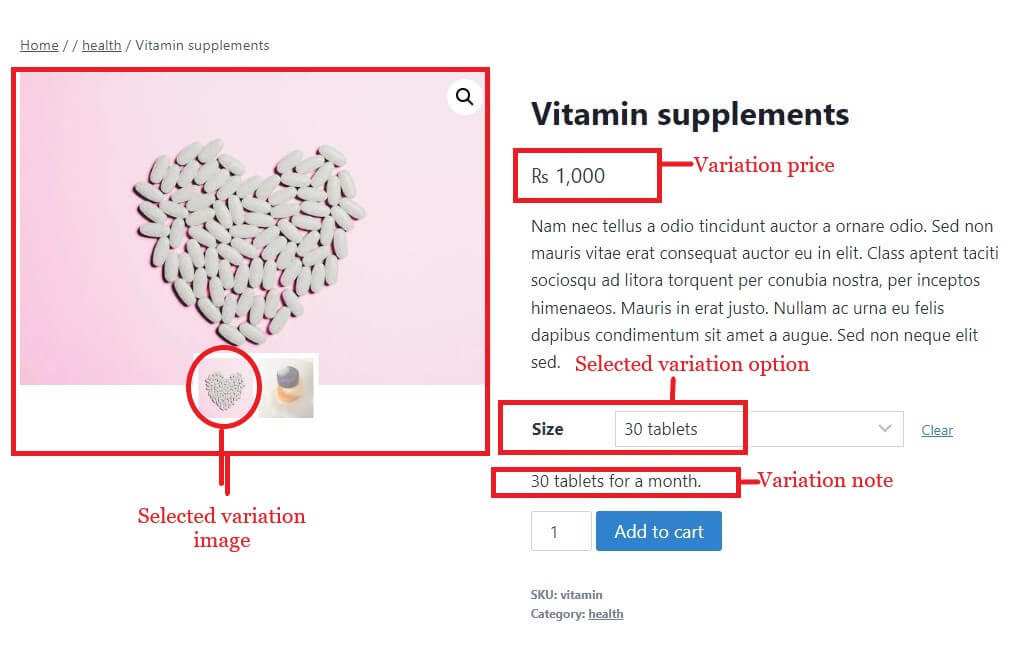
For a deeper insight, let’s have a look at this image:
Bulk Edit Variations:
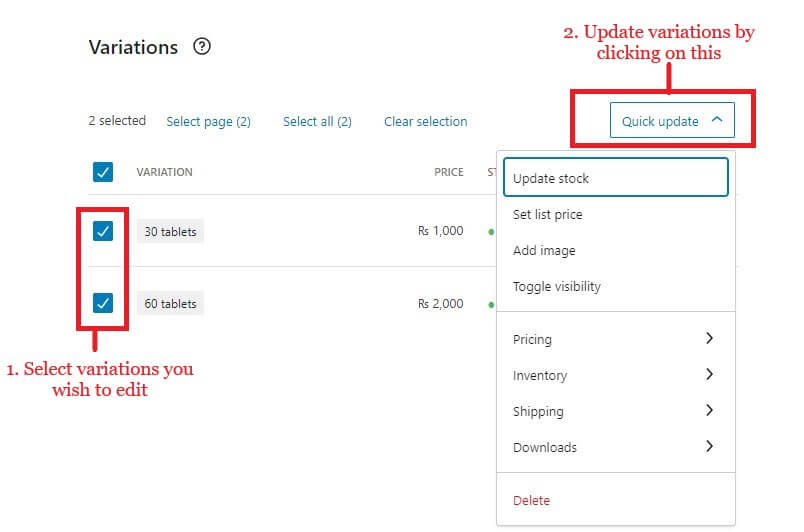
WooCommerce has made it easy to edit or update variations by giving this option. To do this, check the variation options you want to update and click on quick update.
Organization:
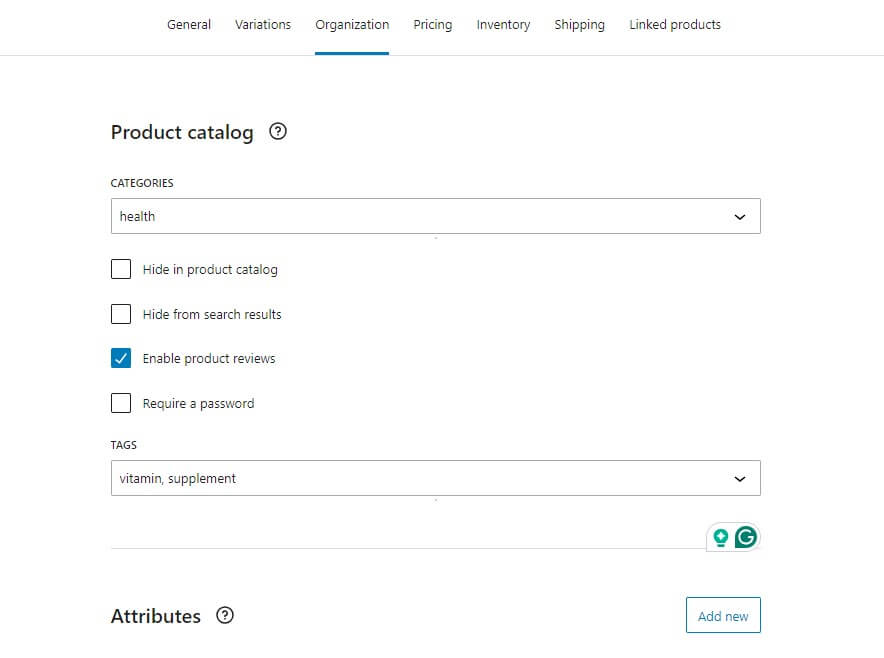
Categories & Tags:
- Improved Navigation: Assigning relevant categories and tags helps customers discover products efficiently. Think of categories as broad sections (e.g., Clothing) and tags as more specific keywords (e.g., cotton, graphic tee).
Visibility:
- Control Display: This section provides control over how your product is displayed. You can choose to hide it entirely, exclude it from search results, or require a password for access.
Reviews:
Control product reviews: Now, you can enable or disable reviews for customers on each product.
Attributes:
- Enhanced Filtering: Product attributes allow you to define variations within a product type (like size and color for clothing). This helps with filtering and searching for specific variations by customers.
Pricing:
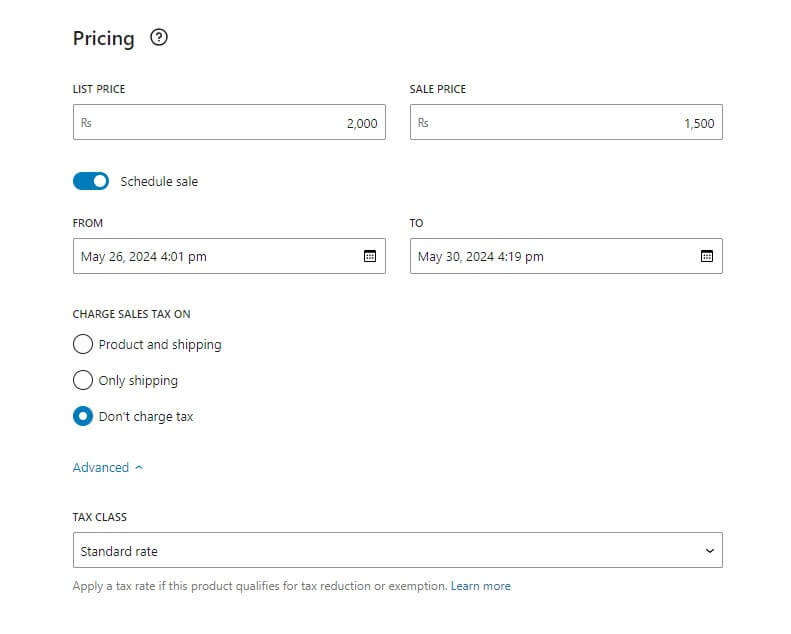
Pricing is the “pricing” of your product. You will be presented with some options:
- List Price (Regular Price): Setting the standard price of your product.
- Sale Price: Defining a temporary discount to override the regular price.
- Schedule Sale: Setting specific start and end dates for your sale price. You will also select the hour and minutes for the start and end of the sale on the product. The ‘FROM’ field is for the start of the sale and the ‘TO’ is for the end of the sale.
- Charge Sales Tax On: This section provides control over what elements are taxed for your product.
- Product and shipping: Choose this option if you want to calculate and charge sales tax on both the product’s base price and the shipping cost. You set the tax rules in WooCommerce settings.
- Only Shipping: Select this option if you want to charge sales tax only on the shipping costs, not on the product itself.
- Don’t charge tax: This option is appropriate when you don’t charge any tax on products.
- Tax Class: Selecting the appropriate tax category for your product based on tax regulations.
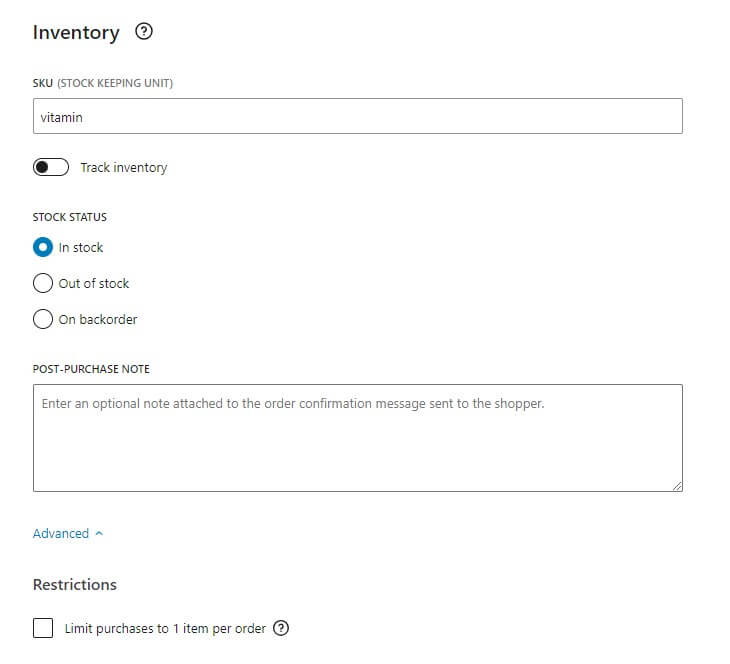
Inventory:
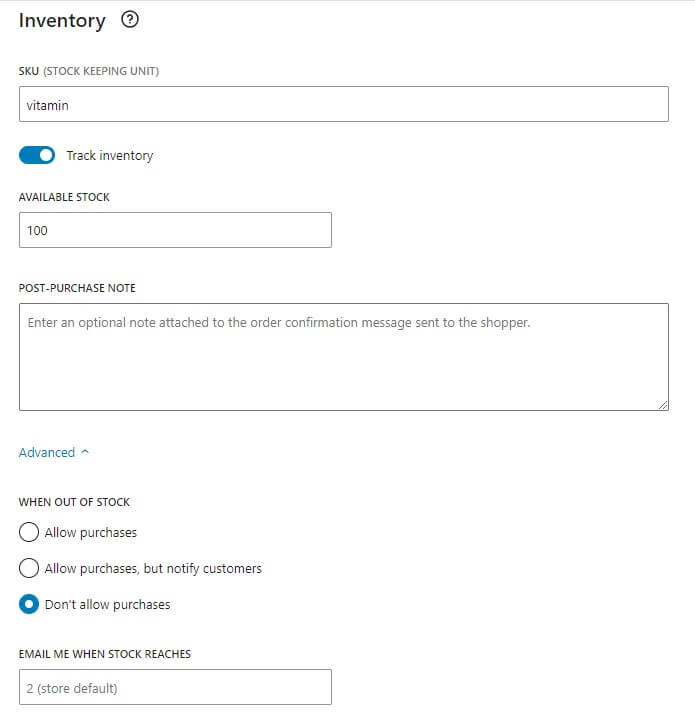
- SKU (Stock Keeping Unit): It is a unique code assigned to each product for easy identification and tracking within your inventory system. Think of it as a secret nickname for each item in your store.
- Track Inventory: This enables WooCommerce to track the exact number of each product you have available for purchase. Enable this option if you want to keep a record of how many products are left in stock.
- Available Stock: Here you tell how many products are in your stock to your customers. This number will be displayed on the front end when the customer selects a product.
- Post-purchase Note: Add a personalized message to the order confirmation email sent to customers. You can include a special message, instructions, or a “thank you” note in the customer’s confirmation email. This note will be shown in confirmation emails sent to customers.
- When Out Of Stock: This setting controls your website’s behavior on the front end when the product stock reaches zero. You can choose from three options to manage customer experience in such situations:
- Allow Purchases: Customers can still add the out-of-stock item to their cart and potentially order it (backorder).
- Allow purchases, but notify customers: Customers can add the item to their cart, but they’ll be informed it’s out of stock and might have a wait.
- Don’t allow purchases: Customers can’t add the out-of-stock item to their cart or complete a purchase for it.
- Email Me When Stock Reaches: Send you an email notification when the stock quantity for a product reaches a specific number you set (low stock alert). It is like an early warning system that tells you when it’s time to reorder a product before you run out. It is very helpful if you are concerned about stock management.
- Stock Status: You will see this option if you’ve disabled the Track Inventory function. It’s an easy-to-understand option that tells customers the stock status. You know about In stock and Out of stock. On backorder means customers can still order the product, but it will be fulfilled once stock is available again.
- Restrictions>Limit purchases to 1 item per order: It sets a limit on how many units of a single product a customer can buy in one order. It’s a way to prevent customers from buying up all your stock of a popular item, leaving none for others. If you check this box, customers will not be able to buy more than 1 item(per product) in an order.
Shipping:
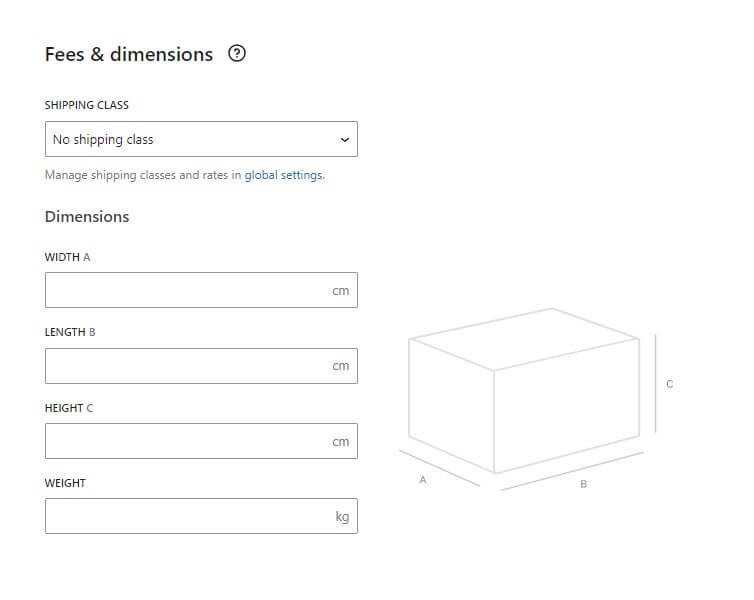
- Shipping Class: Group your products together based on how they need to be shipped (think “Fragile” or “Bulky”). This lets you set different shipping options (costs, speeds) for each group, so you can charge fairly and efficiently.
- Dimensions: Accurately specifying the width(A), length(B), and height(C) of your products is crucial for several reasons. First, it helps you choose the appropriate packaging size, preventing damage to your products during shipping and saving you money on materials. Second, accurate dimensions are essential for calculating shipping costs. Carriers often base their rates on the package’s size and weight, so having the correct dimensions ensures you’re not undercharged or overcharged for shipping.
- Weight: Input product weight to ensure correct shipping costs for you and your customers. It is often required by shipping carriers.
Linked Products:
The Linked Products tab in WooCommerce allows you to connect related products to the one you’re currently editing. There are two main ways to use this feature:
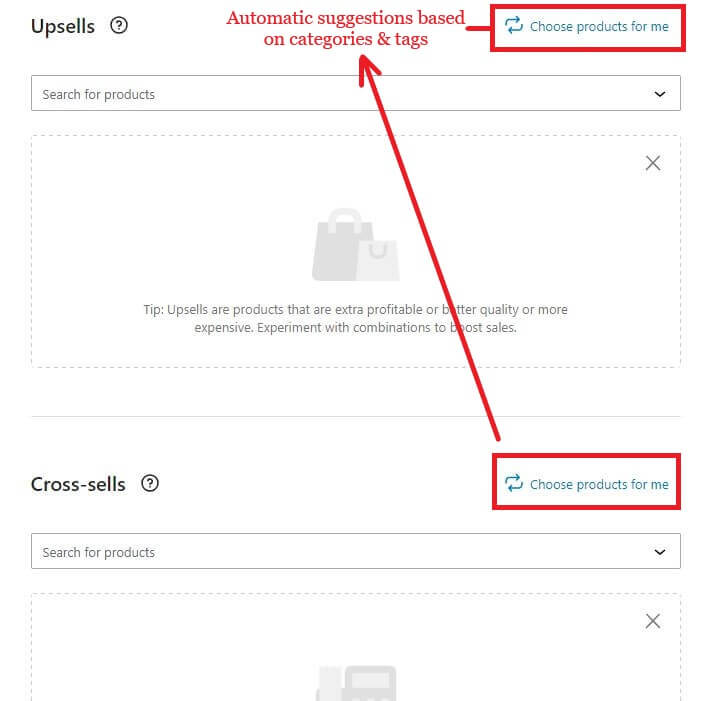
- Upsells: These are products you recommend as alternatives to the current product. Upsells might be more expensive, higher quality, or offer additional features. By showcasing upsells, you encourage customers to consider a potentially better option and potentially increase your revenue.
- Cross-sells: These are complementary products that pair well with the current product. For example, if you’re selling a phone case, you could recommend a screen protector or a charging cable as cross-sells. Cross-sells can increase your average order value by encouraging customers to add additional items to their cart.
The “Choose products for me” feature suggests products as upsells or cross-sells based on your product categories and tags. This can be a helpful starting point, but you can also manually choose the specific products you want to link.
Publish:
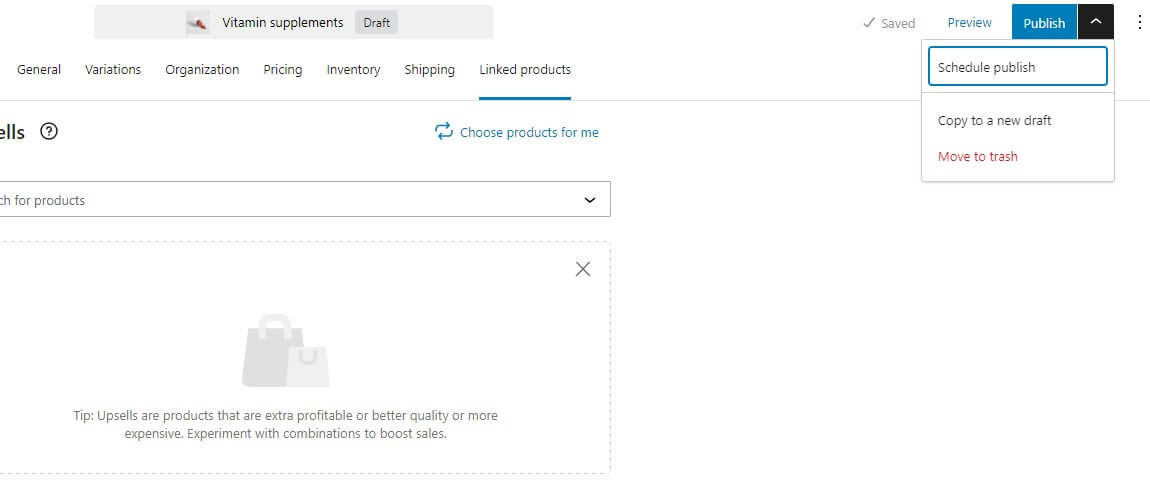
Remember, editing is fun, but publishing pays the bills. Here you can publish the product, schedule publish or even save it as a draft. When you click on schedule publish, it will open calendar with time clock to schedule it.
3. Get Paid:
After publishing the product, now we need to configure step 3 which is Get Paid by connecting payment methods. Go to WooCommerce>Home and select step 3 “Get paid”. If you haven’t installed any payment gateway extensions(like Paypal or Stripe) then you’ll be presented with two methods:
- Direct bank transfer.
- Cash on delivery
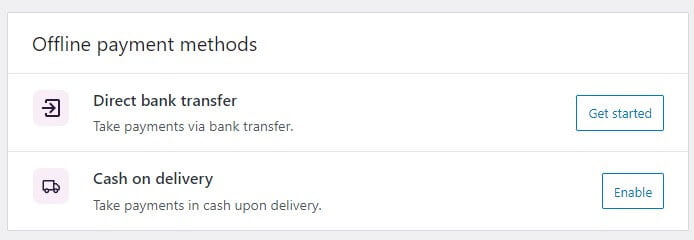
We’ll set both methods:
• Direct bank transfer:
Click ‘Get started’ on the Direct bank transfer option. You will be presented with a form to fill up your bank account details:
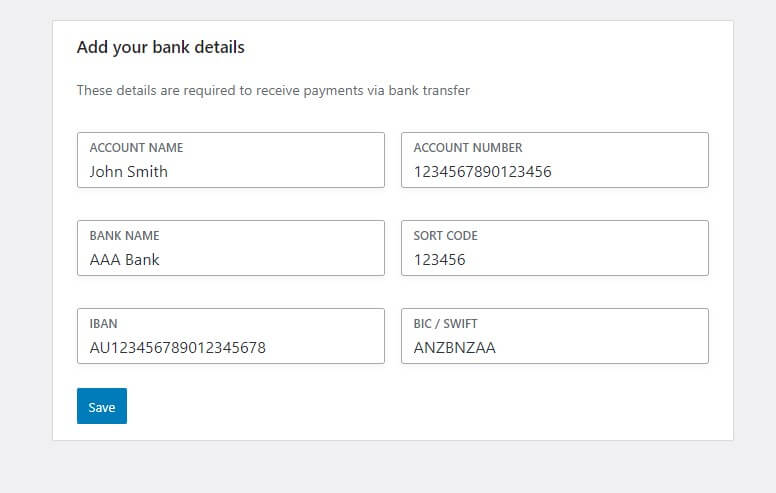
- Account Name: Exactly as it appears on your bank account. This ensures the smooth transfer of funds from WooCommerce customers to your account.
- Account Number: This unique identifier for your bank account is essential for routing payments to the correct destination. You can find your account number on your bank statements, cheques, or online banking portal.
- Bank Name: The official name of the bank where your account is held.
- Sort Code (depends on location): A sort code is an additional routing number used by some banks, particularly in the UK and Ireland. If you’re unsure whether you need a sort code, contact your bank.
- IBAN: An IBAN (International Bank Account Number) is required for international transfers from WooCommerce customers. If you expect to receive payments from customers outside your country, check with your bank to see if you need an IBAN and how to obtain it.
- BIC/SWIFT Code: The BIC (Bank Identifier Code) or SWIFT code is an international bank identifier used for international payments. If you expect to receive payments from customers outside your country, your bank can provide you with this code.
After filling out the form, click on Save to start receiving payments directly into your bank account.
• Cash on delivery:
Simply click ‘Enable’ to start receiving payments with the COD(cash on delivery) method. After enabling, you’ll see the ‘Manage’ option in place of Enable. Select Manage to configure the COD method.
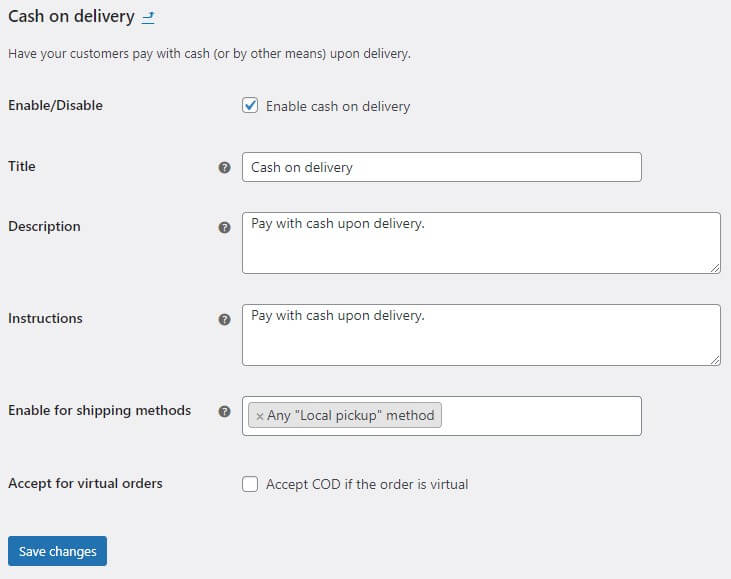
- Enable/Disable: This is the main switch to turn COD on or off for your entire store.
- Title: Here you can set a custom title for the COD option that will be displayed to customers during checkout. For example, you could use “Cash on Delivery” or “Pay Upon Delivery.”
- Description: This section allows you to add a brief description of the COD payment method for your customers. You could explain what COD is, any additional fees associated with it, and how the payment process works.
- Instructions: These instructions will be shown to the customer on the ‘Thank you’ page after checking out when the customer selects the COD method for payment.
- Enable for shipping methods: Here you can choose which shipping methods will allow COD as a payment option. By default, COD is not enabled for any shipping methods. This includes flat rate method, free shipping method (Note: Generally not recommended for free shipping as it can increase your risk of non-payment), and local pickup methods (Note: Might not be applicable depending on your setup, as local pickup usually involves the customer paying at the time they collect the order).
- Accept for virtual orders: This option lets you decide whether to allow COD for virtual products (products that are downloaded or don’t involve physical delivery). Generally, COD wouldn’t be used for virtual products, so you’d likely keep this disabled (unchecked).
4. Collect Sales Tax:
Ever wondered about that extra bit added to your shopping bill? That’s likely sales tax, a fee collected on certain purchases. Businesses act as tax collectors, adding the sales tax to your bill and then sending it to the government.
This revenue helps fund important public services and programs. Rates and rules can vary by location, so be sure you’re following the guidelines in your area!
Head over to WooCommerce>Home and select step 4 “Collect sales tax”. It will open a window with 2 steps. First, give information about your store’s location:
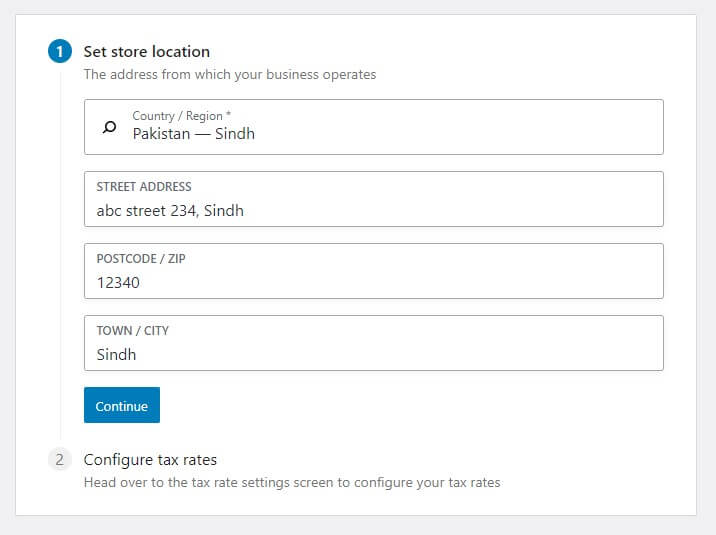
Click Continue and Step 2 will pop out with an option to Configure. Select Configure to set up sales tax rules for your WooCommerce store. It will open the ‘Standard rates’ tab but first, let’s configure the ‘Tax options’ tab.

Open the “Tax options” tab and configure it:
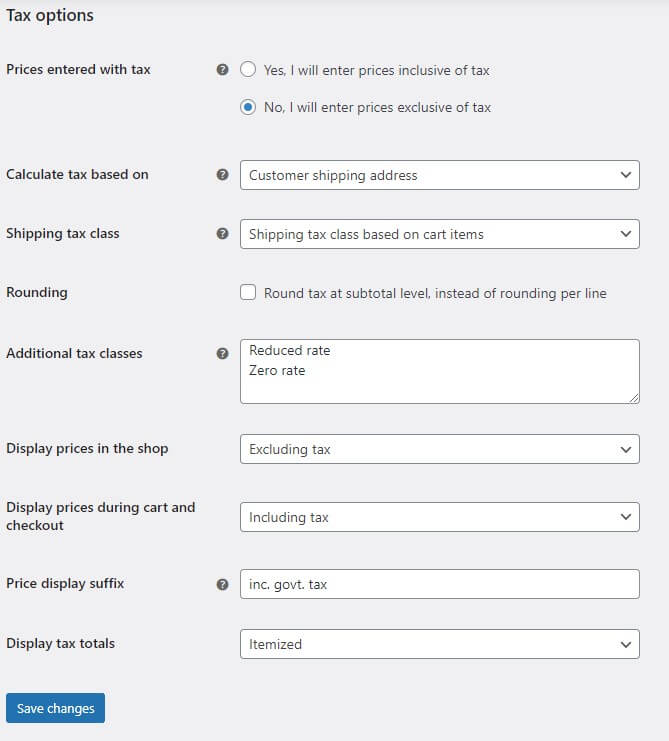
Prices entered with tax:
- Yes, I will enter prices inclusive of tax: You’ll enter the total price a customer pays, including any applicable taxes. This is the most common approach, as customers typically see prices advertised this way.
- No, I will enter prices exclusive of tax: This means you’ll enter the base price of the product before taxes are added. The final price the customer pays will be calculated by WooCommerce based on the tax rate and their location.
Calculate tax based on:
- Customer shipping address: Most common and compliant, ensuring customers pay the correct tax rate based on their location.
- Customer billing address: Useful for digital products or subscriptions, but check your local tax laws for compliance.
- Shop base address: This option can lead to customers paying the incorrect tax rate. In most regions, tax laws require businesses to collect tax based on the customer’s location (shipping address) and not the store’s location.
Shipping tax class:
- Shipping tax class based on cart items: This option is like a choose-your-own-adventure for shipping taxes. It lets you set the tax on shipping costs based on the products your customer has chosen. Imagine you sell a mix of products, some with tax and some without. This option lets you apply the correct tax rate to shipping based on that mix. For example, if a customer buys a book (tax-exempt) and a shirt (taxed), you can set the shipping tax to reflect that only the shirt portion should be taxed.
- Standard: This option applies the standard tax rate you’ve set in WooCommerce to your shipping costs, regardless of the tax rates applied to your products.
- Reduced rate: Similar to standard, but applies the reduced tax rate (if you have one set up) to your shipping costs, again regardless of the tax rates for your products.
- Zero rate: This option makes shipping completely tax-free. However, it’s important to confirm with your local tax laws whether this applies to your situation.
Rounding:
Rounding refers to how small, often uneven numbers (like cents) are simplified when dealing with taxes in your WooCommerce store.
You can choose to round the tax for each item separately (like rounding each item’s sales tax on your receipt) or round the total tax for your entire order at once. Both methods are common. Make sure to check with your accountant to see which one works best for your location’s tax laws. There’s a separate issue called “off-by-one rounding errors” that this setting doesn’t affect, but that can happen if you mix and match how prices are displayed with and without tax throughout your store. Just be consistent!
Additional tax classes:
Additional tax classes in WooCommerce allow you to categorize your products based on their tax treatment, giving you more control over how taxes are applied. Here’s a breakdown:
- Default Tax Class: This is the standard tax class that applies to most of your products. It’s typically set based on your local sales tax rate.
- Adding New Tax Classes: WooCommerce lets you define additional tax classes beyond the default. This is useful for situations where some products have different tax rates or are exempt from tax altogether.
When to Use Additional Tax Classes:
- Reduced Tax Rate: If you sell items with a reduced tax rate (like groceries in some regions), you can create a separate tax class for them.
- Zero Tax Rate: For products exempt from tax (like books or medicine in some locations), you can create a “Zero Rate” tax class.
- Shipping Tax: You can create a separate tax class specifically for shipping costs, allowing you to set a different tax rate for shipping compared to your products.
Display prices in the shop:
This section controls how customers see prices on the shop page or product page. You can choose to show prices including tax (like most stores) or excluding tax (showing the base price).
Display prices during cart and checkout:
This section determines how customers see the prices of products on the cart and checkout page. Keep tax included during cart and checkout to avoid any confusion.
Price Display Suffix:
This option lets you add a short message next to prices (e.g., incl. VAT or incl. govt. tax). Useful for clarity when showing prices with or without tax.
Display Tax Totals:
Choose how to show the total tax at checkout:
- Single total: One number of total tax to be paid, like most receipts.
- Itemized: Breakdown of tax per item (useful for complex tax rules).
After configuring all settings click on Save Changes. Now let’s set tax rules in the Standard rates tab.
Setting standard rates for tax:
After opening the Standard rates tab, click on ‘Insert row’ to enter tax rules.

Provide these details to the blank places:
- Country code: 2-letter code identifying the country (e.g., US for United States).
- State code: 2-letter code identifying the state/province (e.g., CA for California). Leave blank to apply to all states of that country.
- Postcode / ZIP: Code for specific locations within a country (postcode in UK, ZIP code in US).
- City: Name of the city or town. (Leave blank for all cities)
- Rate %: Percentage value of the tax rate (e.g., 20 for 20%).
- Tax name: User-friendly name for the tax (e.g., Sales Tax, VAT).
- Priority: Order in which multiple tax rates are applied (lower number = applied first).
- Compound: Whether the tax is applied on top of previously applied taxes or not.
- Shipping: Whether the tax applies to shipping costs or not.
Let’s have a look at how the tax rate appears on front-end:

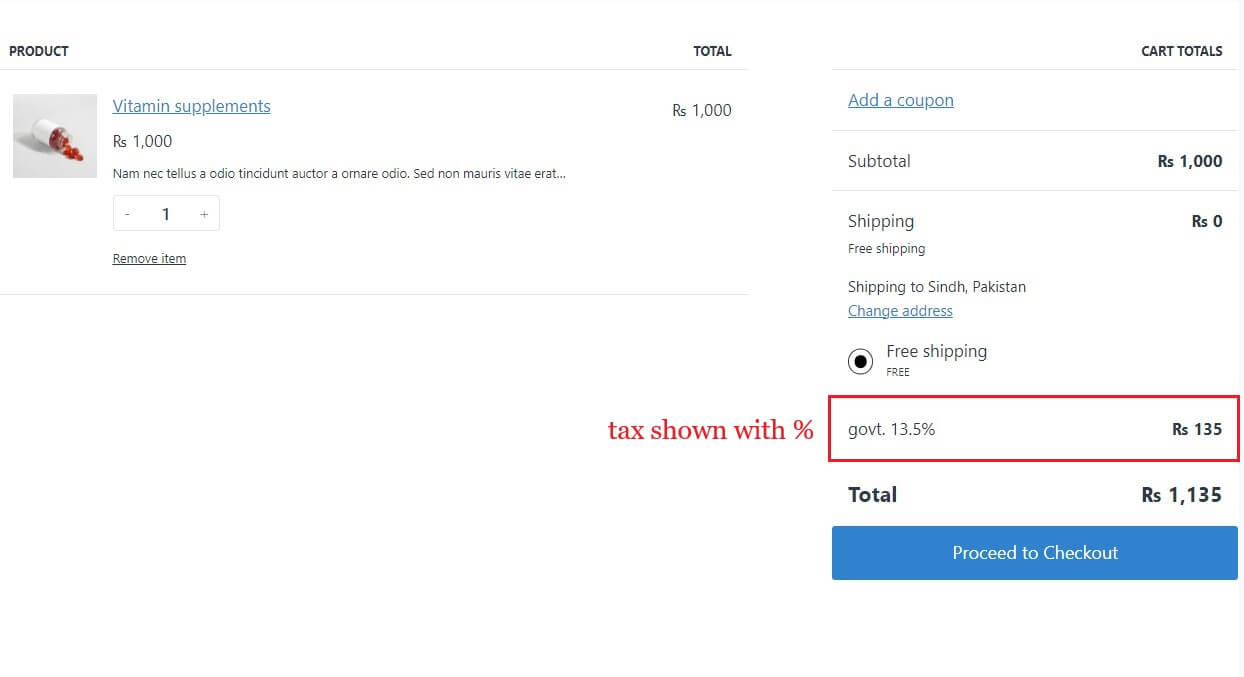
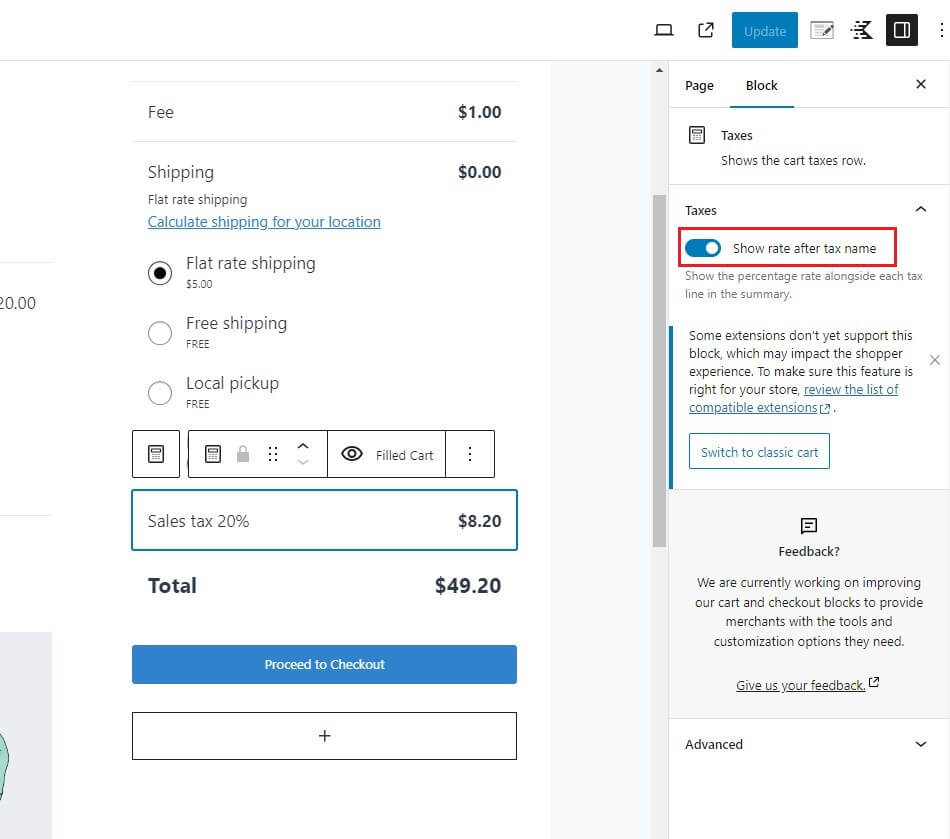
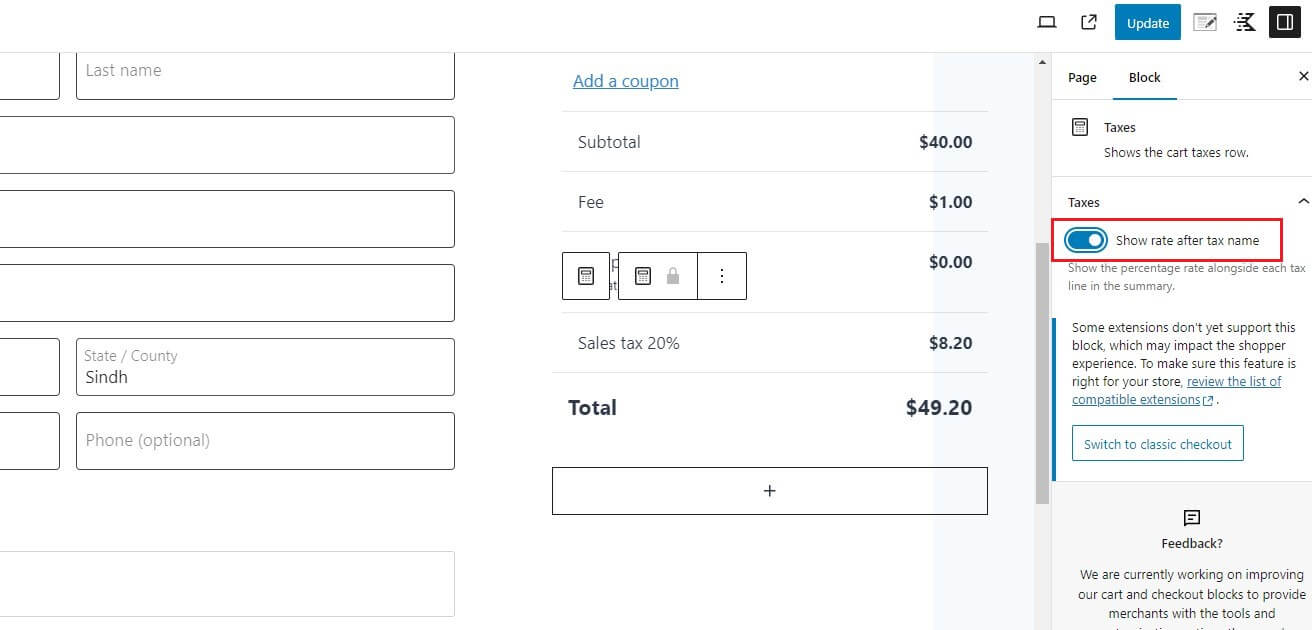
You can enable/disable tax rate % to show or not by editing both blocks. Go to Pages>All pages and select the page you want to edit.
When the cart or checkout block is open, click on the Sales tax column and enable or disable “Show rate after tax name” according to your preference.
5. Grow your business:
Last but not least, in this step WooCommerce suggests some best marketing extensions to take your online store to the next level. These tools help you find new customers, connect with existing ones, and turn them into fans of your brand.
Imagine reaching people searching for what you sell, nurturing relationships with emails, and winning back abandoned carts – all easily done! WooCommerce extensions make your eCommerce dreams a reality.
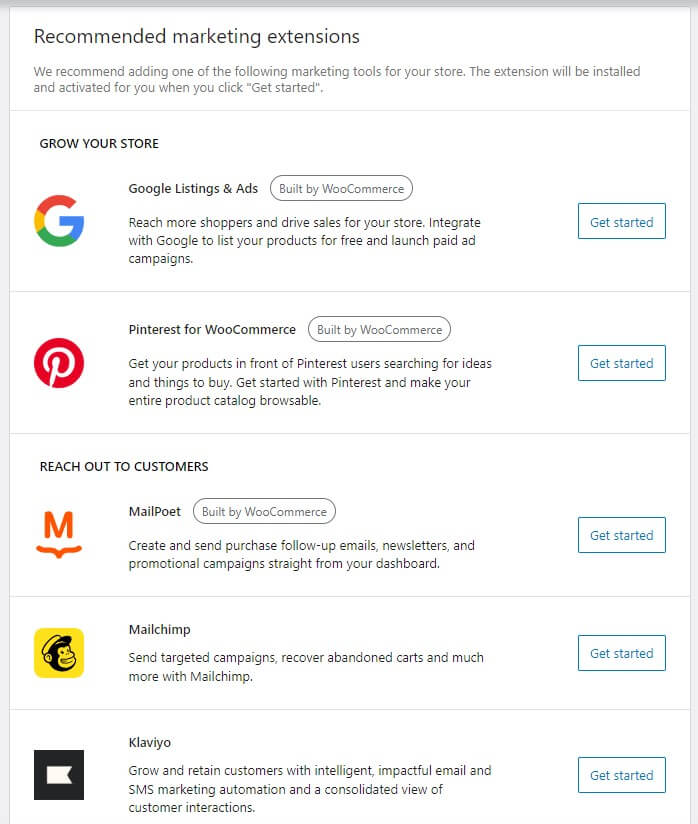
Grow Your Visibility:
- Get Listed & Get Seen: Reach millions of potential customers with Google Listings & Ads. Showcase your products for free on Google searches and launch targeted ad campaigns to drive traffic to your store.
- Pinterest Power: Tap into the inspiration-seeking world of Pinterest with the Pinterest for WooCommerce extension. Get your products in front of users actively searching for what you offer, increasing brand awareness and sales.
Connect with Your Customers:
- Email Marketing Made Easy: Streamline your communication with MailPoet. Create and send targeted email campaigns, newsletters, and special offers directly from your WooCommerce dashboard.
- Engage & Recover: Mailchimp offers a robust email marketing platform with features like targeted campaigns and abandoned cart recovery, perfect for re-engaging potential customers.
- Automated Success: Klaviyo provides automated email and SMS marketing tools, along with a central view of your customer interactions. This helps you build stronger relationships and boost customer retention.
The essential steps to grow your store are completed. Now let’s talk about the giant e-commerce platform WooCommerce plugin itself.👇
How WooCommerce Started?
WooCommerce’s journey began not with online stores, but with website aesthetics. In 2008, Mark Forrester, Magnus Jepson, and Adii Pienaar joined forces to create WooThemes, a company specializing in crafting beautiful WordPress themes.
While WooThemes found success in the design world, they noticed a major pain point: existing e-commerce solutions for WordPress were clunky and complex.
This sparked an idea – what if they could create a user-friendly e-commerce plugin that seamlessly integrated with WordPress? Thus, this idea changed into reality. The WooThemes team decided to leverage an existing e-commerce plugin called Jigoshop.
Jigoshop offered a good foundation, but it wasn’t as user-friendly or widely adopted as they desired.
Since there’s no official confirmation that WooThemes directly hired the original Jigoshop developers, Mike Jolley, and James Koster, to create WooCommerce, so it’s more likely that they leveraged the existing Jigoshop codebase and built upon it, focusing on user-friendliness and accessibility.
So, in September 2011, they leaped and launched WooCommerce. Within a few years, it became the leading e-commerce platform for WordPress websites. Because of its simplicity and user-friendliness, WooCommerce resonated with businesses of all sizes.
Its tight integration with WordPress, a widely used content management system, further fueled its adoption.
In 2015, Automattic, the company behind WordPress.com and Jetpack, acquired WooThemes. This acquisition included WooCommerce, as it was a product created by WooThemes. Under Automattic’s guidance, WooCommerce has seen exponential growth.
It now powers millions of online stores, offering an extensive range of extensions, themes, and plugins to cater to diverse business needs.
Why Choose WooCommerce for eCommerce?
If you’re planning to set up an online store, integrating e-commerce capabilities into your WordPress site is an excellent choice. Among the various options available, WooCommerce stands out as the premier e-commerce plugin for WordPress.
So, why should you opt for WooCommerce for your WordPress site? Here are several compelling reasons that make WooCommerce the preferred choice for millions of online businesses worldwide:
1. Open-Source Flexibility: 🔓
WooCommerce is open-source, offering unmatched flexibility. You have complete control over your online store’s design and functionality, allowing you to customize it to meet your unique business needs
2. Extensive Customization Options: 🎨
There is a wide range of themes and extensions available that you can link with WooCommerce to tailor your online store’s look and functionality.
Whether you need a simple store or a complex e-commerce solution, there are endless customization options available to create a unique shopping experience for your customers.
3. Comprehensive Product Management: 📦
WooCommerce provides robust product management capabilities, allowing you to easily add, edit, and organize products. You can manage inventory, set product variations, and create detailed product descriptions and categories. This level of control ensures your store operates smoothly and efficiently.
4. Diverse Payment Options: 💰
WooCommerce supports a wide range of payment gateways, including PayPal, Stripe, and major credit cards. This flexibility allows you to offer multiple payment options to your customers, enhancing their shopping experience and potentially increasing your conversion rates.
5. Rich Analytics and Reporting: 📊
Understanding your store’s performance is crucial for growth, and WooCommerce offers detailed analytics and reporting tools. You can track sales, review customer data, monitor stock levels, and analyze your store’s performance to make informed business decisions.
Whether you’re a beginner or an experienced e-commerce entrepreneur, WooCommerce provides the tools and support you need to thrive in today’s competitive digital landscape.
With its user-friendliness, powerful features, and endless customization options, WooCommerce empowers you to build a successful online store without the hassle. So, why wait? Choose WooCommerce and unlock a world of e-commerce possibilities!
Pros & Cons of Using WooCommerce:
It’s a popular choice for entrepreneurs and businesses of all sizes, but is it the right fit for you? This heading will cover the pros and cons of WooCommerce, helping you decide if it’s the perfect platform to launch your e-commerce journey.
Remember: Starting an eCommerce journey is a continuous learning process. Be patient, experiment, and stay updated on industry trends. WooCommerce is a powerful tool, and with dedication and effort, you can build a thriving online store.
WooCommerce has opened the door to a world of possibilities for your eCommerce aspirations. With its flexibility, affordability, and vast community support, WooCommerce empowers you to build a store that reflects your brand and caters to your specific needs.
Now that you have the knowledge to get started, take the plunge and embark on your exciting eCommerce adventure.
Remember, success comes with dedication, continuous learning, and a willingness to adapt. So, unleash your entrepreneurial spirit, leverage the power of WooCommerce, and watch your online store blossom!
We hope that we’ve covered all the essentials to launch your WooCommerce store! Still have questions? Ask away in the comments, and let’s get you started.
If you find this guide helpful, share it with your friends, and let’s help more entrepreneurs launch online stores because, as they say, “Sharing is Caring”.


